Want to know how to start a blog with WordPress and SiteGround?
Looking for a checklist for how to create a blog for beginners?
You’ve surely heard how bloggers are making money from home, and you want to know how they do it.
Perhaps you have questions like,
- What is blogging?
- How much does it cost to start a blog?
- Should you build a blog in 2025?
- How do you create a blog with WordPress?
This beginner’s guide to blogging has all the answers you need to start your blog today! I’ll take you step-by-step through “all the technical stuff” like Genesis Integrationosting, domain nameAutumn Lane’s premade logoss, and WordPress, help you choose a blogging niche, as well as set you on the path to profitability.
I’ve been blogging since 2016 after I quit the 9 to 5 life, and blogging has become my full-time income. Inside this complete guide to starting a blog with WordPress, I’ll be sharing everything I’ve learned so you can become successful even faster than I was.
You’ll also learn all the best affordable blogging tools for beginners.
Ready to enter the wonderful world of blogging? Let’s get started!
What is a Blog?
A blog is a website or webpage that is regularly updated with informational or reflective content. Rather than a static website that is rarely changed, a blog is constantly creating content.
What makes a website a blog is that it’s like an online journal, that’s routinely updated, like once a week or every few weeks depending on the site. Websites typically don’t get updated frequently, but rather just share information, but a blog is updated every time a new blog post (think journal entry) is published.
The blog page that displays every blog entry is typically accessible at yourblogname.com/blog. For example, all of Yes To Tech’s blog entries are accessible at yestotech.com/blog.
Blog post entries appear in reverse-chronological order, meaning newer posts appear before older ones on the blog page.
As you might have guessed, loads of traditional websites like those created businesses and brands, also have blogs. All you really need to know is that what makes a blog different from a website is that content is being created ongoing. For example, my blog publishes a new post every Sunday and Wednesday.
Don’t worry if any of that is confusing to you right now, we’ll talk more about this later on in this beginner’s guide to starting a blog in 2025.
This Beginner’s Guide to Starting a Blog is organized into four parts:
- #1: Choose a Blog Name and Niche
- #2: Using WordPress and Themes
- #3: The Technical and Legal Stuff
- #4: Start Creating Content
Plus, be on the lookout for the homework icon 📝, which recaps all the steps you need to take in every section.
THIS POST MAY CONTAIN AFFILIATE LINKS.
IF YOU MAKE A PURCHASE FROM THESE LINKS, I MAY EARN A SMALL COMMISSION.
CLICK HERE FOR MY FULL DISCLAIMER STATEMENT.
How Much Does it Cost to Start a Blog?
Before we jump headfirst into all the technical stuff, like domain names and hosting, we need to have a chat about how much it costs to blog.
The number one question you likely have right now is some variation of, “How much does blogging cost?” or “Can I blog for free?”
You can blog for free, but if you’re planning to start a blog and grow it into a business, then you shouldn’t. A lot of the free blogging platforms, like Wix, or even Blogger, offer “free” plans, but they come with crippling limitations that will cost you more in the end.
I want to save you all the grief and headaches, later on, so together in this beginner’s guide, I’m walking you through how to start a blog that you can build on, that scale easily, customize to your liking and make profitable.
Starting a blog the right way is an investment, one you can reap the rewards for years, just like I am and countless other bloggers.
👉🏽 RELATED POST: How to Follow Your Dreams with No Money
Total Cost to Start a Blog with SiteGround and WordPress:
Let’s take a look at the total cost of starting a self-hosted blog with WordPress.org and SiteGround hosting (the best hosting company for beginner bloggers).
I’ve broken down the cost of creating a new blog by all the main investment bloggers need to make in their first year of blogging. Plus, I’ve indicated whether this is a one time purchase or an annual fee.
Your bare minimum costs for starting a blog include purchasing:
- A domain name, which is your web address, ex. Yourblogname.com ($8.88 annual fee – NameCheap)
- A hosting plan, which is how your website lives and is accessible online ($3.95/monthly or $47.50/ yearly first 1-3 years from SiteGround)
+ Your essential cost to ensure you’re blogging legally include purchasing:
- A legal template bundle with a privacy policy, terms and conditions, and blog disclosure pages ($157 USD with promo code – one-time purchase)
Do not skip legal pages, it’s important to protect you and your content from potential lawsuits and legal issues.
+ Your optional costs to enhance your blog’s design and capabilities:
- A Premium theme, which is the design, look, and function of your website ($49 – $129, one-time purchase with StudioPress or BuddingBiz)
- A professional logo, that represents your brand ($0-$17 one-time purchase)
- An Email Marketing System, that allows you to collect email addresses, manage subscribers and send emails ($0/month with ConvertKit)
You can start a blog today with one year of hosting for just $56.38 USD.I would strongly encourage you to factor legal templates into your starting costs, it’s a one-time purchase that could save you in legal fees later on.
With legal templates, your minimum cost to starting a blog while protecting yourself would be $213.38. Remember they are a one time purchase.
Part #1: Choose a Blog Name and Niche
Let’s start at the beginning and with the very first decision on your blogging journey – choosing a blog name and niche.
- How do you choose a name for your new blog?
- What’s your blogging niche?
- How do you know it’s profitable?
So, what’s in a name? A heck of a lot and also not as much as you would think. Let me explain.
1.1 Don’t Waste Time or Money Choosing a Name
If there’s any part of this process you will waste way too much time pondering, second-guessing, and changing your mind ten million times about it’s choosing your blog name.
It’s not uncommon for beginner bloggers to end up purchasing multiple domains due to indecision. Buying multiple domains makes what should be a $10 max investment skyrocket. So, let me help you avoid wasting time and money on choosing your blog name.
That being said, I’m not sure that you can actually “choose wrong.” But I am sure that you can usually “choose better.”
👉🏽 RELATED POST: How to Find a Business Idea
One of the greatest struggles with choosing your blog’s name is the debate between using your given name or creating a name that represents your blog.
So, how do you decide?
✔️ Choose Your Name or A Name
It’s obvious for this blog, that I choose It’s All You Boo over my name Nadalie Bardo. And that was mainly because eventually, I wanted my blog to have its own identity, separate from my person. It was a long term decision.
And since three years after starting this site, I started NadalieBardo.com as the headquarters for my Pinterest coaching business, it works out perfectly.
Things to Consider when Choosing your blog name:
- Make sure your chosen name is original and not attached to anything else
- Ensure that it’s easy to remember and spell
- That the domain and social media handles are available
- That it’s not too long, keep it under 15 characters (10 is even better)
- Makes sense for your niche (more on this below)
The Four Types of Blogging Names:
To help you think of your own perfect blog name, there are generally speaking four common types of blog names.
- Given Names: A variation of the blog creator’s actual given name, business, or brand name.
- Creative Names: A clever or interesting name with or without a specific meaning.
- Description Names: A name that conveys meaning about the blog’s topic or target audience.
- Keyword / Topic Names: A name that is a search engine optimized keyword or a specific topic.
Remember, you can’t choose wrong, so just decide. And if you’re on the fence about what your niche should be, I strongly encourage you to stick with a creative name that you can easily switch niches.
1.2 How do You Choose Your Blog’s Niche?
It’s niche to meet you (cheesy I know, but I couldn’t help it). Listen, I’m sorry to tell you this but no one knows who you are or where you’re coming from.
You’re likely launching into an already crowded industry, there are millions (if not more) bloggers and websites for just about everything. No matter what you choose, likely someone else is more or less already doing it.
Hold up, I’m not trying to discourage you, I’m trying to encourage you to find your focus and purpose aka your niche. Repeat after me, niche, niche baby! You are more likely to bust in the doors and claim a spot at the microphone of your target audience and gain the attention of your co-bloggers when your blog has a clearly defined niche.
What is a blogging niche?
Not sure what I’m talking about? For example, for a new blog, “lifestyle” is not a niche, it is a general, broad category that could literally mean food, style, beauty, fashion, fitness, parenting, home decor and everything in between and beyond.
Think about magazines for instance, although you may find a variety of articles in each they all have a key focus and a target demographic:
- Vogue and InStyle are fashion magazines,
- Bon Appétit and Rachael Ray are food magazines,
- Parents and Fit Pregnancy are parenting magazines,
- and People is a celebrity-focused publication.
They aren’t just general lifestyle magazines. And even if they were, you’re not going to launch and be PopSugar or Huffington Post from day one, maybe not even by day 1,000.
And even then, “fashion” or “food” is still way too broad a place to start. Niche down farther, are we talking toddler fashion or maybe designer handbags? If it’s food, is it homemade meals for families or gluten-free food to go? These are specific niches for a targeted audience. It’s a great place to start.
There are so many niches to choose from, Mikke over at Blogging Explore made this list of 100 profitable blogging niches.
👉🏽 RELATED POST: How to Create A Blog Business Plan
✔️ Choosing a Profitable Blogging Niche
Popular advice might tell you to choose a profitable blogging niche that you can actually make money in. But, I say choose a blogging niche you’re actually passionate about and then you’ll find a way to make money.
Don’t get it twisted, starting a blog, and making money from a blog is hard work. There’s so much misleading information out there with bloggers boasting about making 6-figures in their first month with a new blog.
Want to know what they’re not telling you? It’s not their first blog or they took a course. Yup, they’ve had blogs in the past and have learned how to accelerate profitability. But the majority of bloggers out there aren’t making much money.
I know this from personal experience, it took me about a year to make money from It’s All You Boo, but I made thousands in my first month of having NadalieBardo.com. How? I know what it takes to launch and make money quickly. But that’s 3 years of blogging experience.
As a beginner blogger, you have so much to learn, so put these unrealistic expectations out of your mind from now.
🛑 Don’t Compare Yourself to Other Bloggers
Don’t try and measure up to these mythical bloggers who claim to be raking in the cash from a new blog. Focus on you, your blog, and your interests. I wholeheartedly believe that when you follow your passions, you will find a way to make money from your blog.
But without passion, you’ll give up before you even get started. You have to love what you’re writing about, without that you’ll never make money. This is by no way to say you won’t make money quickly from your blog, but blogging is 100% NOT the easiest or even the fastest way to make money.
Choose the Right Blogging Niche for You
With that real talk out of the way, let’s start focusing on YOU and what you’re actually interested in. Nothing like some self-reflection to help you discover your blogging niche.
Key questions for choosing your blog’s niche:
- Who are you talking to?
- Who’s your audience? Like demographically speaking, how well do you know them?
- What’s the purpose of your blog?
- What are you adding to the existing conversations in your niche?
- What will make your blog special or different from the rest?
Don’t overthink this part either. Start with what you care most about, can most easily write about or provide a unique perspective on. I’m not saying you can’t eventually become a general lifestyle blogger for example, but that’s your long-term game plan, not your starting point.
How niche is too niche? Like, can you be too specific?
Honestly, I’m not sure. I’ve never read any SUPER obscure blogs, but I’m sure they exist. The more niche you are the more limited your audience is, which isn’t necessarily a bad thing.
👉🏽 RELATED POST: How to Go From Side Hustle to Full-Time Business
Test if Your Niche is a Good Fit
Are you struggling to decide on a blogging niche? Is there more than one topic you’re interested in writing about?
Listen, I can so relate to this challenge. And the best test I’ve discovered is to see what you can write about more easily.
It’s as simple as sitting down and writing a blog post for your competing niches. Then, decide which one comes more easily and which one was most enjoyable. Choose the feeling that you want the most.
That’s just one post, imagine having to do this every week. You have to love it and actually enjoying writing about it.
Where Niche and Name Collide
Whatever you decide, your name should either be your name or connect easily with your blog’s niche. If you’re creating a high-fashion blog for stay at home moms, you wouldn’t call it, “momma’s gotta eat.” That name implies that it’s a food blog for moms.
But don’t seriously resist the urge to get caught up on this by making the best choice for your blog in a timely manner.
You could always bring your blog’s name with your niche by using a descriptive tagline. For example, It’s All You Boo doesn’t really mean anything, but my tagline is “Helping you achieve your goals in life and business.”
By choosing a blog with no meaning, you’re always free and more able to change course in the future, swap niches, or even sell your blog. Yes, that’s a thing!
What’s your blog tagline going to be?
1.3 Domain Names and Hosting
Now that you’ve chosen your blog name and niche, it’s time to talk about the technical aspects of starting a blog. You’ve already purchased your domain, and now you need a website hosting plan.
But, if you’re new to the online world of creating websites, you might have no idea what either of these is, how they work together, and why you need them both.
Let’s talk about what a domain is, and how it differs from web hosting.
At the very basics, your domain is your website address that you type into your browser to access your website. On the other hand, website hosting (or just hosting) is what enables the files that make up your website to be accessible at the said web address.
A Quick Domains and Hosting Explainer
The easiest analogy for understanding what a domain is and what hosting is, is to think of it in terms of building a house.
If creating a website is like building a house, you’d need a few things, the land, the street address, and the structure for the actual building.
What’s a domain name?
The street address is your domain, it’s where your blog (or in this example your house) lives. To find it you search for it in Google or type the direct address into your browser search bar. Your domain is your URL, like www.yourblogname.com. You purchase this address at a yearly fee via a domain name registrar like NameCheap for roughly $10 a year.
It’s worth noting, that to keep your ownership of said address private, you want to make sure you’ve always purchase Privacy or WhoIs Protection, a standard feature at no additional cost with NameCheap. This way your name, address, phone number, and email address are not publically accessible on sites like who.is.
When purchasing your domain name, you also do NOT need to upgrade to email, website builders, SSL certificates, or any other features they encourage you to add to cart at checkout, as hosting plans typically include everything else you need to start a blog.
What’s web hosting?
The land is your hosting plan, it’s the digital landscape where the files that make up your website are stored. All the text, pages, images, code, plugins, content, and more that together equals your blog are “hosted” or if you prefer “housed” on web servers by your hosting provider.
Not all hosting providers are equal, and there are some key deciding factors to consider when choosing who to host your new blog with. You want to keep costs down when you’re starting a blog, but also have the best support as a beginner blogger.
For the following reasons and more, I highly recommend SiteGround hosting. Typically hosting costs anywhere from $12-15 or less per month, with massive savings offered for new sign-ups. New hosting plans with SiteGround are available for $3.95/month for 12, 24 or 36-month terms.
For a beginner blogger, SiteGround checks all the boxes, it’s affordable, they have great up-times (meaning your site is almost always live), unlimited email addresses, easy WordPress installation and so much more!
And I’m not just saying that because. I built my first website in the 90s, and having worked with and hosted websites with several hosting providers over the years, I highly recommend SiteGround. Not only is it incredibly affordable and user-friendly but their customer support is especially valuable to beginner bloggers.
You might say, but what about Bluehost? I have personally used BlueHost after a blogger recommended it but quickly learned that like many bloggers out there who recommend this provider, they’re only in it for the referral fees, not the features.
On any feature, pricing, or capability comparison, SiteGround has Bluehost and other providers like GoDaddy and HostGator beat for beginner bloggers.
✔️ Purchasing Hosting For Your Blog
Ready to start your new blog? You want to sign up for a hosting plan at the best possible price, for the longest amount of time. If you can afford it, secure rates like $3.95 for 36 months = $142.20 USD.
Remember, with SiteGround (or any hosting provider) your renewal rates will be closer to $11.95 per month after your introductory promotional offer expires.
But, there’s absolutely no need to panic. For one, in three year’s your blog will be making money from advertisements, affiliate marketing, or the products you’ve created.
Plus, here’s a pro tip: you can easily cover the cost of hosting, if not make even more, as a SiteGround affiliate. By making just two referral sales, you can cover your initial investment for three years of hosting. Trust me, everyone is going to start asking you how to start a WordPress blog.
A word to the wise, some hosting providers also provide domain registration, but the best price for domain names are found with domain registrars like NameCheap.
Click here to join SiteGround for $3.95 per month for your first 1 – 3 years.
1.4 WordPress.com vs WordPress.Org
Now that you know all about domain names and hosting plans, it’s time to talk about WordPress. Especially, what WordPress.org is and how it differs from its free blogging platform counterpart, WordPress.com.
Continuing with my building a house analogy, WordPress.org provides the next component: the structure of the house. It’s technically a Content Management System (CMS) and not the only one out there, but definitely the most popular.
And deservingly so, with endless possibilities for plugins, themes, constant updates, and customizations no two WordPress.org sites are the same. 34% of all websites are built on WordPress including the New Yorker, MTV News, and Variety. There are so many sites built on WordPress.org. If WordPress is good enough for these big names, it’s the best platform for you to start a blog.
So, What Exactly is WordPress.org?
WordPress by itself is free, it’s your domain and hosting that costs. If you’ve been binge-reading advice about creating a blog, you’ve likely seen the phrase “self-hosted WordPress” site. This is WordPress.org and it requires hosting.
But unlike WordPress.com where you’re able to build and access your website on this site, with WordPress.org you’re installing WordPress (the CMS you’ll use to build your site) on your own domain (that’s being hosted).
This not only gives you more control and freedom to access all the features and capabilities of WordPress that are otherwise restricted by price and plan on WordPress.com (and we’ve already talked about this).
A good hosting provider, like SiteGround, makes installing WordPress on your domain simple and easy, without you having to ever go to the actual WordPress.org website.
Ready to start building your blog with WordPress and SiteGround?
Complete the following steps.
📝 Your Part #1 Homework:
#1. Your first assignment is to choose your blog’s name. Remember to keep it under 15 characters long and even 10 characters if possible.
- Optional: head over to who.is and search to see if the .com is available. If so, then search the top social media sites for its availability.
#2. Purchase the domain right here on NameCheap. Privacy Shield is included for free, and you do not need any of the other add-ons they offer (you’ll get everything else you need from your hosting provider).
Turn on auto-renewal if you don’t want to lose your domain name in a year when it expires. Remember, you pay annually for your domain name. The renewal cost for .com is $12.98 (which is what you should be buying unless your blog is location-specific).
3. Then, secure all your social media handles. Sign up for @yourblogname or @yourreal name for Instagram, Facebook, Pinterest, Tik Tok, and Twitter.
4. Lastly, sign up for WordPress hosting with SiteGround. Enter your blog domain name (that you purchased from NameCheap), then choose the right hosting plan for you, 12, 24, or 36-months. Remember, you will always get the best price the first time you sign up.
Part #2: Using WordPress and Themes
You are well on your way to starting a blog with WordPress and SiteGround! By the end of this, you’ll graduate from being a beginner blogger.
Your first step is to install WordPress on SiteGround. It’s not complicated at all. With just a few clicks you’ll be set up and ready to choose a theme.
2.1. Installing WordPress on SiteGround
Have you verified your order yet? Be sure to check your email, and click on the “Verify Order” button.
- You’ll then want to log into your SiteGround account here, using the email as your username and password you created at sign up.
- Click on “Websites” in the top bar menu, then click “Site Tools” beside your blog domain name.
- Then, click on WordPress, then “‘WordPress” in the sidebar menu, followed by “Select” underneath WordPress.
- Enter a secure username and password that you’ll use to access your site. Do not enter “yourblogname” or “admin” these are commonly guessed by hackers.
To complete your set up, you’ll want to follow the remaining steps, including updating your DNS (domain name servers). This lets your domain name registrar, NameCheap, know where to find the files that make up your new WordPress site.
2.2 Update Your Domain Name Servers
Ready to be able to actually see your new WordPress site at your domain name? Let’s connect it!
First, you need to find your domain name server information for SiteGround. You can check the welcome email titled, “Your website [yourblogname] at SiteGround” you received or right inside your SiteGround dashboard.
No matter your hosting provider, it should look like “ns1.######.siteground.us” and “ns2.######.siteground.us.”
Next, you need to go to your domain name registrar to enter these DNS values.
- Log into your account with NameCheap (or wherever you purchased your domain name from).
- Then, navigate to “Manage” to the far right of yourblogname.com.
- Now click on “Namecheap BasicDNS” and select “Custom DNS”
- Enter the two nameserver addresses you received from your hosting provider, one on each line.
- Click the checkmark to save.
Note, that it can take up to 48 hours for this to be updated, in reality, it usually takes an hour or so for your WordPress site to appear at yourdomainname.com.
Your New WordPress Site
If you’ve completed all the previous steps, and your site is now live, you’ll notice that your blog seems to be missing something, or quite a few things actually. For one, when you visit yourblogname.com it doesn’t look like anywhere as great all the other amazing blogs out there.
So, what’s missing? Why is everything look so basic? And how can you ensure no one sees this?
Just like a house without any paint or wallpaper on the walls, furniture, art or any decorations is bland and boring, so is your blog! Your blog needs a theme, and if you’re smart, you’ll start your blog not just with any theme, but one that matches your branding.
In order to replace the default WordPress theme with your chosen theme, you first need to access your blog’s backend (basically you need to log into your site).
✔️ Logging into Your WordPress Backend
Have no idea how to log into your new WordPress blog? No worries, this is a common struggle for beginner bloggers.
- It’s simple, go to yourblogname.com/wp-admin. This is the standard login page for all WordPress sites unless you change it. (Be sure to read the section below on blog security to help protect your site from being hacked.)
- Enter your username or email you used to set up WordPress with your host, in my case SiteGround.
- If you forgot your login details, use the forgot password form to reset your password (you need your email address for this).
2.3 Add a Coming Soon Page Plugin
Before you start shopping for the perfect theme and designing your new blog, you want to add a coming soon page. This just makes you look all that more professional and quals your worries about, “OMG, what if someone sees it before I’m ready to launch.”
The Free Coming Soon Page & Maintenance Mode by SeedProd makes this super simple. It enables you to work on your new blog in secret, while visitors can only see a “coming soon” page.
✔️ How to Find and Add New Plugins
To add a new plugin, access your WordPress site’s backend (which you’ll see after you log in), then hover “Plugins” (the plug icon) found on the left-hand navigation.
🛑 When installing a plugin you want to make sure they’ve been updated fairly recently, have a numerous amount of active installation, and is compatible with your version of WordPress.
- Type into the search bar “seedprod” to find this coming soon plugin,
- Click “Install Now,” then click “Activate”
Once activated, you will be able to work on your blog and see all changes when logged in, but all outsiders will only see your coming soon page.
Don’t forget to disable this feature or plugin when you’ve finished creating your site and you’re ready to launch.
Now that this is taken care of, let’s talk about upgrading your blog from the basic WordPress default theme to something that really wows.
2.4 What’s a WordPress Theme?
A theme sets the esthetics for a website. It determines not only the look and feel of a site but also it’s functionality and features.
As you can imagine, as you sit there looking at the default WordPress theme Twenty Twenty, not all themes are the same or even created equal. And that’s not all, a good theme (the only type you want to create your blog with) should be a child theme of a framework.
To continue our house analogy, think of the framework (or parent theme) as the walls, hallways, stairs, and floors of a house. And the child theme is simply the decorations and a bit of paint.
The biggest advantage of using a child theme is how easy it is to change themes within a framework. Basically, it’s super easy to redecorate, as long as you’re within a framework.
Frameworks and child-themes are also premium themes, that cost typically anywhere from $40 to $129, depending on the theme.
Premium themes also include features you need to be a successful blogger, like mobile compatibility (a requirement to rank in Google Search results). Plus, who doesn’t love extra customer support as well as demo content (so your site can look like the sample site from the start)?
But, why can’t you use free themes to start a blog? Do you have to purchase a Premium theme to start a WordPress blog?
Premium Themes vs Free Themes
Although 1000s of themes are available to you for free right inside your WordPress backend, free themes are often poorly coded, abandoned by their creators, and fail to be updated.
There are also often free versions of premium themes available to you, but oftentimes they restrict features and functionality just like the free blogging platforms.
Remember, WordPress is constantly being updated and enhanced, so if your theme isn’t updated every time WordPress is, your website will have problems or stop working entirely. You’ll lose functionality and access to things like plugins.
Think of your smartphone, you have to keep updating your operating system and device or things lose compatibility, it’s the same with WordPress. Thankfully WordPress updates are free and the premium theme updates as well.
As mentioned earlier in how much does it cost to start a blog section, purchasing a premium theme is an optional, not essential purchase when starting a blog. It is, however, a one-time purchase that you will eventually need to make to be successful at blogging.
In terms of priority investments for new bloggers, after a domain name and hosting plan, a legal template bundle is certainly more important than a premium theme.
If this additional cost of a premium theme is outside of your budget for starting a blog, get started with a basic free theme, and upgrade as soon as you can. Remember, themes are one-time purchases.
The Best Premium Themes for Bloggers
I know you’re excited to start your blog and before you start googling for the best themes let me help you skip the headache.
After three years of making money blogging and launching countless other websites and blogs as a freelancing web designer, the best premium themes for bloggers (and business owners) are built on the Genesis Framework by StudioPress.
Do you like my site? It’s built on Genesis. And things on the backend have user-friendly features, like easy access to the header and a suite of Genesis only plugins like eNews Extended which makes adding email opt-in forms that fit your theme a breeze.
The Genesis Framework was created by StudioPress a reputable WordPress theme developer, that is now owned by WP Engine. StudioPress regularly updates and maintains the Genesis Framework. But other website creators like BizBudding also create themes for the Genesis Framework.
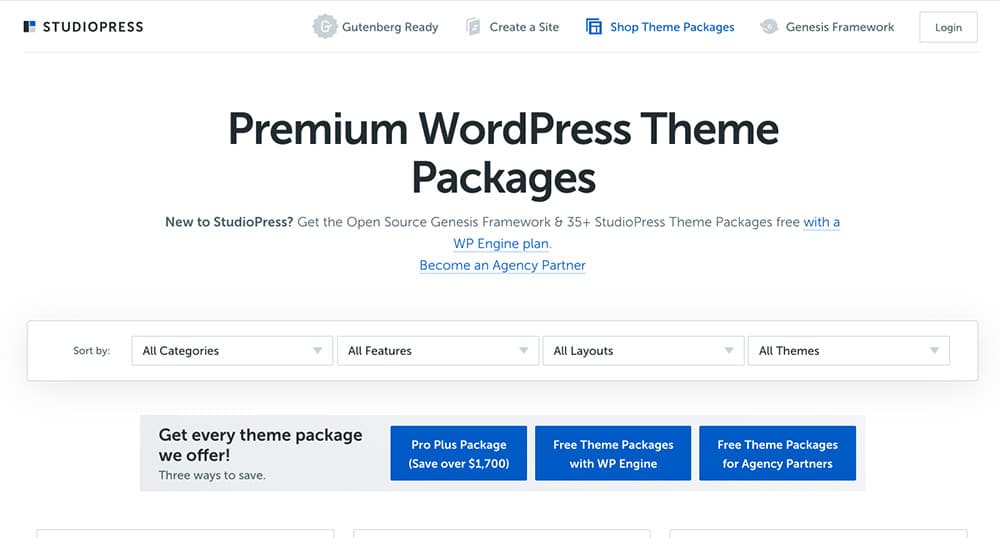
When you purchase a Genesis Child-Theme you also get a copy of Genesis Framework. So, say a few years down the road you decide to change your theme, if you stick within the framework it’s very easy to switch and change how your site looks instantly without complications.
2.5 How to Choose Your Theme
When deciding on a theme to create your WordPress blog it’s important to think about your branding. Don’t panic, branding is super simple once you’ve decided on a few things.
Ask yourself questions like:
- What are your colors, tones, feel, or style of your blog’s brand?
- Does your brand use bold and bright, or light and fine fonts?
- What the esthetic of my brand? Is it modern, classic, or something else?
It’s a lot easier to decide once you spend some time reviewing existing blogs. Decide what you like and what you don’t like.
That’s not all, you also want to choose a theme that already has the functionality you want and already looks at how you desire your blog to look. Save yourself the stress or the need to hire a web developer, and just pick a theme you totally love.
By functionality I mean, do you like the menu, where the logo is, how the pages look, how it looks on mobile, and what the fonts are? Before purchasing pay close attention to these features.
Where to Purchase Your Premium Theme
Once you have an idea of what you’re looking for in a theme, it’s time to start shopping for a theme to start your WordPress blog with. As you window shop for your theme, envision what it would look like with your colors, your images, and your content.
Remember, premium themes make it easy and usually come with demo content so you can install it and work from a finished product.
Genesis Themes range in price from $49 to $129 USD. With Third-Party themes (not designed by StudioPress) closer to $79 and StudioPress themes closer to $129.
The Best Premium WordPress Theme Creators
- Looking for a feminine theme to start your blog? I recommend checking out BluChic.
- Need a professional, business looking theme? Visit the Theme Forest.
- Want a theme that’s simply elegant? You’ll love 17th Avenue Themes.
- Looking for a SEO-optimized theme? You need WP Engine.
- Want a more modern design with lots of white space? I encourage you to check out StudioPress directly. There are also quite a few Third Party sites for sale on the Studio Press site.
Be sure to choose a theme that already fits your designed brand style and functions, I cannot stress how important this is.
Ready to add your new premium theme? Or to find a Free theme to start?
2.6 How to Change Your Theme
To replace the default WordPress theme with your chosen theme, you need to access your blog’s backend. You now know how to log into your site, so do that now if you need to (go to yourblogname.com/wp-admin).
✔️Upload and Activate Your New Premium Theme
First, download your premium themes .ZIP file from your Theme’s developer. For example, if you purchased a Genesis theme from StudioPress, log into StudioPress and download a copy of the Genesis Framework and your choosen child theme (for example, Foodie Pro).
- Then from your WordPress backend, hover over to “Appearance” (the paintbrush icon) in the left-hand navigation, then click on “Themes”.
- Click “Add New” at the top, then click “Upload Theme” and select your copy of the Genesis Framework. Upload and activate it.
- Then repeat the process with your child theme, upload, and activate it.
You have to install and activate your framework, then your child theme. In that order only.
Finish Changing Your Theme by Adding Demo Content
You’ll then want to add any demo content so your new WordPress blog looks exactly like to sample site you fell in love with.
It takes a little bit more than just uploading your theme to set it up properly. The benefit of a premium theme, however, is that it comes with theme documentation that tells you what to do.
All StudioPress themes include a theme setup guide that takes you click-by-click through setting up your home, plugins, widgets, and more.
- To access this guide, simply log into StudioPress (after you’ve purchased your theme).
- From the homepage, click on “theme set-up” beside your theme’s name, then follow the instructions.
If you’ve purchased your premium theme from StudioPress, this is also where you get help when you need it. Remember, starting a blog with a premium theme means you also get support for anywhere from 30-days to life, depending on who you purchased your theme from.
✔️Adding a Free WordPress Theme Instead
Not ready to invest in a premium theme? No worries, you can get started with a free theme for now.
Here’s how to find and activate a free theme from right inside WordPress:
- Log into your back end (yourblogname.com/wp-admin remember)
- Navigate to the “Appearance” panel, then click “Themes” and click on “Add New” towards the top of the screen.
- Instead of uploading a theme, search for one right in WordPress. You can search by popularity or even by features.
At the very least, your free theme needs to be “accessibility-ready” meaning that it’s mobile compatible, a requirement for appearing in Google search results.
Once you’ve settled on a free theme you love, you want to go ahead preview it. It gives you an “idea” of what your theme will look like.
Just know it doesn’t always look exactly how it does in the preview, just like premium themes you have to set up the homepage after installing.
If you’re lucky your free theme will come with set up instructions but don’t count on it. Check out SmartBlogger’s list of best free WordPress themes for bloggers, to help you decide.
- Once you’ve settled on your choice, you want to go ahead and install and activate your free theme to start your blog.
Do Not Skip This Important Step
After you’ve set up your theme, please be sure to check the “Users” panel (accessible from your left-hand navigation) and delete any admin accounts added with your theme.
These accounts have emails assigned to them, and hackers will try and log into your site with generic usernames like “admin.” Protect yourself by simply deleting them and assigning any posts to your real admin account.
2.7 Creating the Perfect Logo for Your New Blog
Depending on your theme, you might have a dedicated space in your blog’s header (the top of the blog) for a logo. It’s usually front and center, or off to the top left.
It’s common for blogs to have logos, and for some, a blog logo doubles as the profile picture on social media.
As a beginner blogger, please do not spend unnecessary time or money creating a logo when you’re just starting. There are plenty of free or cheap ways to create logos that you can choose from.
Plus, you can always rebrand or pay a fancy graphic designer for a unique logo when you’re blog is making money.
Make sure that you’re creating the properly sized logo for your WordPress Theme. Some logos are square, others are rectangular.
- To find out what size to create your logo, go to the WordPress backend, hover over “Appearance” (the paintbrush) then click “Customize” (or access it directly from your homepage by clicking “Customize” in the top bar).
- Then select “Header Image.” At the very top, your theme will tell you what the optimized size for your logo should be.
If your header has a non-white background, be sure to upload a .PNG file with a transparent background.
✔️How to Create a Logo for Free
There are a few online logo design tools that are free of cost! And they’re so easy to use.
- The first tool is the Wix Logo Maker, which with just a few selections like design style and color, you can create your logo at no cost.
- The second tool is the Canva Logo Creator, which lets you create a free logo in minutes. You can even browse the different templates based on niches like beauty, fashion and food, and drink.
- Another favorite logo design tool is the free Kittl Logo Maker, which helps you create a stunning professional logo for your brand in minutes.
- You can also check out the free logo makers at Logo Makr, Free Logo Design, and Mojomox.
✔️Buy Ready Made Logos for $17 and Up
Not graphically inclined and would rather use a ready-made template? No problem, Autumn Lane’s premade logos are the perfect option for you.
For around $17, you can purchase your template, provide your information, and have your custom logo the same day or within a day.
Another option is to hire a graphic design on 99 designs, Fiverr, Freelancer, or even Upwork. Prices range by designer, just be sure to do your due diligence before hiring.
📝 Your Part #2 Homework:
#1. Install WordPress on your hosting plan (via the SiteGroung dashboard), then update your Domain Name Servers with your registrar (NameCheap).
#2. Install and activate a Coming Soon Plugin like Coming Soon Page & Maintenance Mode by SeedProd, then turn it on.
#3. Choose a free theme in WordPress, or buy a Premium theme from StudioPress, BluChic, BizBudding, or another reputable theme creator.
#4. Install and activate your new WordPress theme, following the theme set up guide to completion.
#5. Create or buy a logo, then add it to your WordPress site’s Image Header as a .PNG file.
Part #3: All the Technical and Legal Stuff
Ready for the next step to start your blog? With your domain, hosting, and now theme settled, it’s time to talk about essential WordPress plugins that keep your blog safe and secure.
We’ll also discuss the 3 essential legal pages your blog should have before launching, and why they are important to protect ing you and your readers. Plus, you’ll finally know what GDPR is and why it matters.
3.1 Technical and Legal Steps to Starting a Blog
With your theme installed and logo created, you’re on your way to creating your WordPress blog with SiteGround! But, before you start celebrating your new life as a beginner blogger, there are a few important steps you still need to take.
🛑 Please don’t skip ahead, as the plugins and pages I’ll be walking your through in this section are for your own protection. They help to secure your site from unwanted attacks, as well as keep you compliant with online regulations bloggers need to know about.
Let’s get started with a few more essential security and safety plugins you should install, activate, and set up immediately after starting a blog.
👉🏽 RELATED POST: Are you blogging legally?
A. The Best WordPress Backup Plugin
Listen, you’re a beginner blogger and new to creating WordPress sites, which means that it’s highly likely you will make mistakes and potentially break your site.
But, don’t worry, it happens to even the best of us at one time or another. You never know when this will happen, it could be a bad plugin update, an incompatibility, and just like that your site no longer works.
That’s why it’s not only important to have 24/7 support with your hosting provider, shout outs to SiteGround, but also to use a reliable Backup Plugin like UpdraftPlus – Backup/Restore.
And yes, you want to set this up even if your hosting provider does daily backups. And a word to the wise, always backup your site BEFORE updating any plugins, themes, or making major changes.
There are quite a few backup plugins out there, but UpdraftPlus is the clear winner. Not only is it free, but you can set the backup frequency and choose from every online storage site to store your backups, from Dropbox and Google Drive to Amazon. Meaning that you can just use your existing cloud storage, and no pay more.
B. WordFence Security
Since you’ve protected your new WordPress blog from internal threats like yourself, it’s time to heighten security from external threats like hackers.
Yup, you heard me. Once your blog becomes popular, people and bots will try to break in. It’s going to happen, so you might as well prepare now.
Secure your site with the WordFence Security plugin. This comprehensive plugin offers an all-in-one solution to your WordPress needs, from preventing logins and offering 2 step authentication for admin accounts, to blocking dangerous IP addresses and scanning your site daily for vulnerabilities.
The basic version of WordFence is free to use, and if you’re ever hacked or in need of more security you can upgrade to the paid plan for $99/year.
- Click on over to your Plugin’s panel and find and install WordFence Security.
- Follow the step by step instructions for set up.
Confused about setting up WordFence Security? No worries, here’s a step-by-step set-up video or watch this tutorial on YouTube.
Other alternative security plugins for new blogs:
- Sucuri is an alternative security plugin to WordFence Security.
- Loginizer is a free standard WordPress plugin that protects against brute force attacks (repeated log in and password attempts). The features of this plugin are already available in WordFence.
- WPS Hide Login is a free plugin that enables you to easily change your WordPress sites login page from /wp-admin. Be careful when using this plugin to remember what you changed it to.
C. Activate Comment Moderation
When starting a new WordPress blog it’s important to also protect yourself from spammers. Sorry to be the first to tell you but there are people out there who’s entire purpose in life is to just dump useless comments and links on other people’s sites.
And even worse, most of these sites link to questionable content you 100% do not want your blog to be associated with.
Your first step to protecting your site from spam comments and commenters is to turn on comment moderation in your WordPress back in.
- Hover over “Settings” in the left-hand navigation, then click on “Discussions.” Then check the box beside, “Comment author must have a previously approved comment.”
- You can also add “bad words” to your “Comment Blocklist” section further down this page.
With this setting activated, the first time commenter responds you will have to manually approve them, then going forward all their comments will automatically appear.
Sadly, this is just the first measure and on its own isn’t enough to dissuade spammer commenters.
D. Akismet Spam Protection Plugin
There’s a plugin dedicated to protecting WordPress blogs from spam comments, and its name is Akismet. It’s just one of the many plugins to stop profanity on your site.
Be sure to set up this standard WordPress plugin as soon as you start your blog. You want to head on over to the Akismet website and create an account.
- The plugin’s creators will ask you an odd question, what you think it’s worth, choose anything from zero and up to proceed.
- Then add your account key to the plugin back in WordPress to activate it.
E. GDPR Cookie Consent Popup
Have you heard of GDPR (General Data Protection Regulation) before? How all bloggers and websites need to be GDPR compliment?
Well a very long story short, GDPR is an EU law that came into effect on May 25, 2018, and regulates the use and collection of personal data. And for bloggers, personal data also means emails, names, IP addresses, and other identifiers.
Basically you need to ensure that when you start a blog, it’s GDPR compliant. I am NOT a lawyer, it is your responsibility to learn and discern these regulations and your compliance. Check out this post about how to blog legally, with the top ten questions answered by a lawyer.
But, in basic terms (based on my own understanding), you need to both disclose how you intend to use your blog’s visitors’ data and receive consent for that data collection.
Your site also needs to disclose a cookie policy. And thankfully the GDPR Cookie Consent plugin does the heavy lifting and makes it super easy to add an on-brand popup or banner to collect consent.
You already know how to add plugins to your website at this point, search for it and be sure to do your own research about GDPR.
Like I’ve stressed several times in this article, you need to ensure you have the proper legal pages on your site the minute it launches. Your cookie policy needs to be GDPR compliant. But not to worry this is included in the Legal Bundle.
3.2 Protect Yourself with Legal Pages
No instructions on how to start a blog would be complete without legal pages. These pages are for your own protection. You have to launch your site with them published.
Lawsuits are scary, so why open yourself up to the treat? Be compliant and protect yourself, your blog, your content, and your future products from day one.
To make sure that you’re blogging legally, you need to purchase legal templates created by an actual lawyer. No, do not just use a plugin or copy someone else’s, because odds are there legal pages aren’t correct either.
✔️Privacy Policy, Blog Disclosure, and Terms and Conditions
There are three legal pages every blog and website needs, and the Legal Bundle available for a one-time purchase of $160 includes them all:
- Privacy policy template which is GDPR compliant and CCPA compliance
- Disclaimer template which also includes your affiliate and other Disclosures you need
- Terms and Conditions (also known as Terms of Use or Terms of Service) template
Plus, 9 bonuses valued at $1175 including GDPR visitor rights policy, CC GDPR compliance / Email Marketing policy, Cookie Policy, Earnings Disclaimer, Testimonials, and Product Reviews Disclaimer, Sponsored Posts Disclaimer, Lawful Use of Your Website Clause, Third-Party Links Disclaimer, and Mandatory Arbitration Clause.
Yup, everything you need to blog legally, created for a fraction of the cost it would be to hire a lawyer.
Click here to get your legal bundle today. The best part is, it only takes 15 minutes to customize these templates to your blog.
3.3 Set Up Google Analytics
This is one of the most essential add ons every blogger needs. You’ve no doubt heard of Google Analytics. If you’re unfamiliar, it’s essentially a free tool for tracking your website traffic from the Google search engine, get to know your audience activity on your site, and countless other factors.
It’s a completely free service, that you’ll use throughout your blogging career. To add it to your WordPress site, you need to first, sign up, and then connect your website by adding a bit of code to your site. Don’t worry it’s super easy, especially if you took my advice and purchased a StudioPress premium theme.
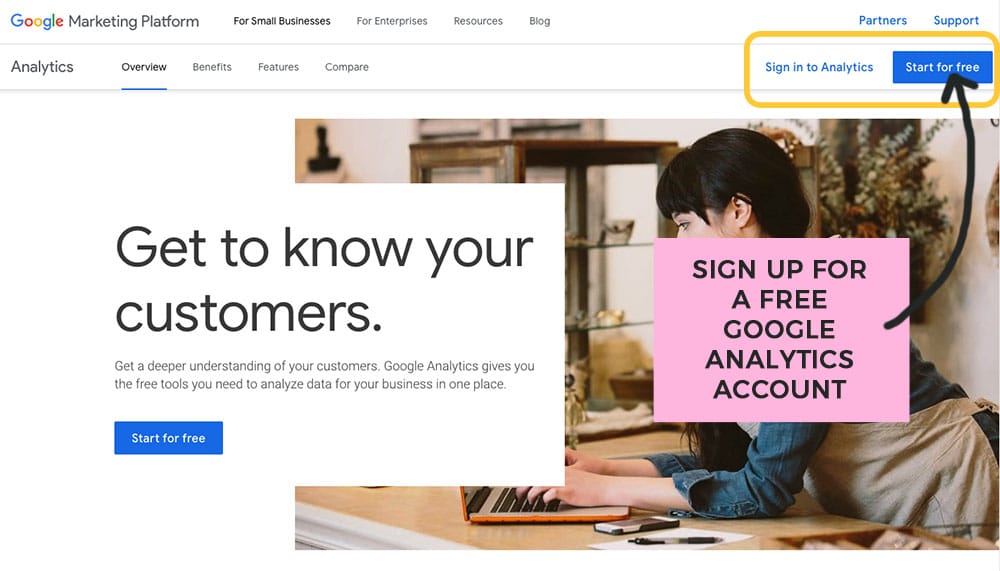
- Head on over to the Google Analytics sign up page here. Click on “start for free” and log in using your Gmail account. If you don’t already have a Google account, create one here (for example, yourblogname@gmail.com).
- Then, click on “Access Google Analytics” and click “Sign up”
- Set up a property (that’s your blog site) by entering all your information including your Account Name (your human name), Website Name (your blog name), URL (yourblogname.com), and choose an industry category that best suits, as well as your time zone.
- Click on “Get Tracking ID” and then complete your sign up.
- Then, simply follow the step-by-step instructions for adding the Google Analytics tracking code to your site (see below for help with this).
Google Analytics Plugins
Adding your code is the most complicated part of this process for beginner bloggers, but I’m going to share two easy ways to do it.
It all depends whether you want to just add the code, or if you’d like a nice website traffic counter added to your WordPress Backend Dashboard.
🛑 Be sure to only add your tracking code to your website once. Do not add code to your header and use a plugin, it’s either-or.
✔️Add the Tracking Code to Header Script
To add your Google Analytics tracking code (which you need to connect Google Analytics to your new blog), you have to add it to the head section of your blog.
If you purchased a Genesis theme, you can easily access the header of your blog using the Genesis function. To access it:
- Click on “Genesis” (the planet icon with a G) in your left-hand navigation,
- Then click on “Theme Settings,”
- And click on “Header/Footer” Scripts”
- Lastly, paste in your Google Analytics tracking code in the “Header Scripts” box
- Go back to Google Analytics and click on “send test traffic” to make sure it’s working
Optional: Use a Header/Footer Script plugin
If you do not have the Header/Footer easily accessible with your theme, you can use a free plugin like Custom Header Footer Scripts for Customizer. Just make sure it’s been updated recently and is compatible with your version of WordPress.
- Simply, go to your WordPress backend, click on “Plugins” (the plug icon), and search for “Header Footer” and install and activate one.
- Then open this plugin and paste in your Google Analytics tracking code to the header script section. That’s it!
- Lastly, click “Send Test Traffic” back on the Google Analytics site.
Use a Google Analytics Plugin
Okay, if you want to be able to keep an eye on your blog traffic, and track how it’s growing for example, then you might want to connect Google Analytics using one of these free plugins.
Both the Google Analytics Dashboard for WP by Exact Metrics and Google Analytics Dashboard Plugin by Monster Insights plugins allow you to view your traffic on your WordPress backend dashboard (top left option in your left-hand navigation).
Remember, that you either add the code to your header or your use a plugin, NOT both.
That’s it! There you have it for all the technical and legal stuff. Do your homework and move onto step four.
📝 Your Part #3 Homework:
#1. Add a WordPress backup plugin like Updraft Plus.
#2. Install a WordPress security plugin like WordFence Security.
#3. Turn on comment moderation then sign up for the Askimet anti-spam plugin. Then, activate it to filter out spam comments.
#4. Add a GDPR cookie consent plugin.
#5. Purchase legal templates for your privacy policy, terms and conditions, and disclose page and create your legal pages.
#6. Sign up for Google Analytics and add your tracking code to your blog’s header script.
Part #4: Start Creating Content
With most of the technical and legal stuff out of the way, it’s time to talk about content. You’ve no doubt heard the phrase “content is king” and nothing could be truer when it comes to blogging.
Beginner bloggers can get so caught up in the design of their blog and get side-tracked by their social media strategy, but at its heart blogging is about content.
Without content, in any format – written, audio or video, you don’t have a blog, you just have a website you spent all this time and money creating.
I know you’re excited to launch your blog, but you first need a content creation plan, publish your essential pages (contact and about me) as well as a handful of blog posts to start.
Creating Pages vs Posts
If you’re new to WordPress, you might be confused about the difference between pages and posts. For bloggers, posts are dated blog entries and pages for static, usually not updated very often pages.
When you write and publish a blog post, it will be a post, that displays the date. They appear sequentially, with most recent posts first on your blog page. Your blog page is usually yourblogname.com/blog.
4.1 Setting Up Your Blog Page
With your new blog, your first step to actually blogging is setting up your blog page. If you purchased a Genesis theme, it’s super simple and most themes make it easy.
- Go to the “Pages” panel in the left-hand navigation (two sheets of paper icon), click on “All Pages.” Then look for the page named “Blog” and click “Edit.”
- All you need to do is select “Blog Template” from the Template drop-down menu on the right-hand side.
If your theme doesn’t come with a blog page already created, simply publish a new page (not post) and name it Blog, leaving everything else blank. Your theme should recognize it as the blog page if it doesn’t refer to theme documentation or contact your theme creator for help.
You can also set your blog page from within the Reading settings page accessibly from “Settings” then click “Reading” (see below).
✔️Add Blog Posts to Your Homepage
Usually, in your theme settings, you can also decide whether your recent blog posts will appear on your home page.
When starting a blog, you typically only have a few pages, including your about me and the contact page, so it’s nice to show off the content you do have on your homepage. As you grow you can reevaluate this, or show a more curated list of posts as I do.
Set up your blog posts on your home page in one of two ways:
- Click on “Settings” to access the “Reading Settings” panel (shown below), or
- Go use the “Customize” theme option from “Appearance” in the left-hand navigation or the top bar on your homepage.
- Then go to “Homepage Settings.”
That’s it! Now all you have to do is actually write and publish a few blog posts to popular these pages, but you can see how it looks with the sample blog posts your theme comes with.
4.2 Sign Up for an Email Marketing Service
Every beginner blogger should start their blog with an email list. Sure, it’ll just be filled with your friends and family for now, but it will grow.
Part of being able to grow your email list is actually having places on your blog for visitors to sign up and join. One thing I love about Genesis themes is that they already come with designed opt-in forms. All you need to do is sign up for one and connect it in WordPress.
What’s an Email Marketing Service?
Simply put, it’s software that enables you to manage your subscribers and send emails (like newsletters and autoresponders). There are a handful of really popular services that bloggers like to use like ConvertKit and MailerLite.
You need an EMS because you cannot run your blog’s newsletter from your Gmail account. It’s against the terms of use!
Over my blogging career, I’ve tried and tested almost every email marketing system out there. And even moved my email list several times.
👉🏽 RELATED POST: How to Create an Online Quiz
✔️Create a Free Email Address with SiteGround
The first step is to create an email address for your domain over in SiteGround. Ideally, your email address will be info@yourblogname.com, hello@yourblogname.com, or name@yourblogname.com, whichever you like best.
You’ll need this domain-specific email address to sign up for your email marketing service. No Gmail accounts allowed, remember?
- Log into SiteGround, navigated to your Dashboard, then click on “Email.”
- Enter an account name, and choose a secure password.
- Then, click “Create.”
✔️ Sign Up for a FREE ConvertKit Account
My #1 choice for an EMS, is ConvertKit. It’s perfect for beginning bloggers just starting a blog because they have a FREE plan until you hit 1,000 subscribers. That means you can create landing pages and sign up forms for free starting right now.
Click here to create your FREE ConvertKit account.
Another amazing feature of ConvertKit is that they protect their customer’s personal information. According to CAN-SPAM laws, you need to have an address in the footer of your emails. But ConvertKit allows you to add their head office address.
Click here to learn more about all the alternatives you have for a physical address when you sign up with ConvertKit.
✔️Create Your First Sign Up Form
Now it’s time to create a simple form, don’t worry it’s just your first one and it doesn’t have to be very fancy.
- Log into ConvertKit, navigate to “Forms & landing Pages” in the top bar.
- Click on “Form” and then create any form.
For now, don’t worry about which type of form you create, it doesn’t matter, you can always update it later. This simple form is simply to connect with Genesis eNews so you can start building your email list.
✔️Add the Genesis eNews Extended Plugin
If you purchased a Genesis Premium theme as I suggested, be sure to install the eNews Extended plugin.
🛑 Do not copy my settings above. The specific configurations for the eNews plugin including form action, email, and name fields depend on which email marketing service you are using.
Refer to the following guides to help you connect your sign up forms:
If you don’t see your EMS listed above, simply Google it!
If you ever need to switch services, like over to ConvertKit which I love, it’s super easy, just create your new forms then update the widgets in the backend.
This is another reason why I love Genesis themes, they use the eNews Extended plugin that allows you to seamlessly transfer from one service to another.
4.3 Set up Your Contact Page
Up next, you need to have someplace on your blog for people to connect with you directly. That’s where a contact page comes in.
And don’t worry if you don’t have your email set up as yet, all you need is a simple contact form and there are plugins for that.
When you set up your contact form, be sure to set it to deliver the submissions straight to your inbox so you never miss a message.
Most themes list a recommended contact form plugin that you should have installed. Go ahead and activate that plugin now if you haven’t already.
The most popular contact form plugins are Ninja Forms, Contact Form 7, and Contact Form by WPForms. Choose whichever one you like best.
You might have to test out a few to see if you like it. Just be sure to enable email notifications.
Then create a new form, and embed it into your theme’s contact page. That’s it for essential pages for launching. Now let’s talk about writing blog posts.
4.4 Write Your About Me Page
The best advice I’ve ever read about writing an about me page is that it’s not about you. Your about me, is to help you form a connection with your reader. It’s about them!
You can, of course, share your story, but in a way that helps them to feel as if you are the best source to follow to find a solution to their problems.
And trust me, we’ve all got problems! That’s the perfect place to start when writing your about page. Talk about the feelings, the pain, and the problems your possible reader might be experiencing. Here’s a pro tip, remember your own experience.
- Then, talk about your story and your own expertise in your niche. Why should they trust you? And listen to your advice?
- Finally, end you’re about me page with an invitation to connect, either joining your email newsletter list or even following you on social media.
4.5 Let’s Talk Creating Content
Want to start creating content like a pro? Here are my top two secrets to writing blog posts that drive traffic, grow email lists, and even make you money
It’s all about choosing the right keywords and creating a combination of evergreen and seasonal content.
The very basics of Search Engine Optimization (SEO) are choosing the right keywords. In case you’re like, what is SEO? It’s the act of setting up your content in a way that is favorable to being discovered in search engines like Google.
Yes, that might sound complicated to you now, but it doesn’t have to be when starting a blog. For now, we’ll just talk about finding the right keywords and topics for your content.
Evergreen vs. Seasonal Content
Have you ever heard of “evergreen content”? Or maybe writing “seasonal content” for the holidays for example?
Evergreen content is always relevant, meaning it drives traffic 365 days a year. It’s writing about topics that your readers are interested in all year round, not just for a season, day or week.
On the other hand, seasonal content is only popular at a certain time throughout the year. It’s creating content for the holidays, a specific season or celebration.
When creating content, it’s important to create both evergreen and seasonal content. Evergreen content will bring you consistent traffic all year round, but seasonal content will skyrocket your traffic.
There’s a reason that most blogs get the most traffic over the holiday season from Thanksgiving to New Year’s Eve in the United States, and why traffic is the lowest during the summer slump (from late-May to early-August).
Website traffic follows audience interest. And people are just so much more engaged when planning for the holidays and looking for shopping deals. But during the summer, they’re off their phones and living life.
What are your readers interested in?
✔️ Start with Evergreen Content
As a beginner blogger, you should focus first on creating a handful of high-quality evergreen blog posts. This is how you start and launch a blog that gets noticed.
My advice is to write 3 to 5 blog posts that are over 1,500 words in length and cover all the basics of your topic. With blogging, quality beats quantity any day.
No need to rush them either, write one post every week or two. You’re a beginner blogger and still have much to learn, burning out trying to write a blog post a day is a madness.
Content might be king, but consistency is key. Publish your posts on a schedule, if it’s every two weeks, then stick to it. Once that’s manageable, then up it.
When I started It’s All You Boo, I only published a new blog every two weeks, then spent the majority of the time promoting my content. And it wasn’t until two years into blogging that I started to publish blog posts twice weekly.
80/20 Rule: Create it and Share it
Keep in mind the 80-20 rule (and the only one bloggers need to know), spend 80% of your time promoting content, 20% creating it. Social media promotion needs to be part of your strategy!
Think about it no one reads your blog or knows that you exist, how will you succeed at blogging? Or ever make money?
✔️ Then, Plan for Seasonal Content
After you’ve created your evergreen blog posts, then you can start focusing on creating seasonal content. It’s important to remember that you need at the bare minimum a month, if not two months, of lead time with seasonal posts.
For example, if you’re writing a holiday gift guide for Christmas, you cannot publish that post on December 25th, you need to publish it late November. This is especially true when you’re a beginner blogger, and I would encourage you to stick to a few months ahead.
I know it seems odd to be publishing holiday content so early, but you need those two months to build traction with your posts. Remember, you and I are not the Huffington Post or PopSugar where we can publish a post that immediately reaches millions.
As a beginner blogger, your primary outlet for finding readers will be social media, with Pinterest chief among them. No matter the platform, it takes time for posts to get shares and build up a massive amount of likes, reshares, or repins.
4.6 Domain Authority and Search Traffic
In a few years, once your domain has built up some authority, you can rely more and more on organic search traffic from search engines like Google and Bing.
For my first two years of blogging, Pinterest traffic was my number one source of traffic, but since it’s become Google search traffic.
Not sure what domain authority is? It basically tells search engines how reputable and trustworthy your site is. You build it by consistently creating high-quality content, getting more shares from your site as well as backlinks from other sites to yours.
As you can imagine when you’re brand new, this takes time, but it’s never too early to start thinking about Search Engine Optimization (SEO) and using keywords.
✔️Update Your Permalink Settings in WordPress
Before you start publishing, one pro tip for your Search Engine Optimization is to go into your WordPress backend and update your blog post permalink formatting.
- Navigate to “Setting” in your left name navigation, then click on “Permalink”
- Then change it from the default settings to the “post name” option.
This is important because having dates in your links will hurt your SEO.
You want your links to be as short as possible and only contain your keyword phrase. That gives them the best chance to rank in search engines like Google.
Add the Redirection Plugin
While on the subject of links, go ahead and install the Free Redirection plugin. This powerful plugin will ensure that if you change any post or page links, it’s always forwarded to the new one.
After downloading and installing, be sure to set up the plugin and turn on auto-redirections for page and post link changes when you set it up.
This helps to protect you from sending visitors to 404 not found pages, which look bad and having broken pages isn’t great for your SEO either.
4.7 The Basics of Search Engine Optimization
The one thing that beginner bloggers wait to learn is always SEO, but you really shouldn’t. Even though it can seem complicated to learn how to optimize your content with keywords so search engines send traffic your way, it’s really not.
The very basics of SEO are learning how to find your keywords and how to use them. The hardest part is honestly finding the right one, it’s part skill, part luck.
I do warn you that since you’ve just started a new blog it might take some time to reap the benefits of SEO.
✔️ A: Find Your Keywords
Trust me when I say I’ve tried every which way to hunt down the best keywords, but this is the easiest, most stress-free way to find them. You do not need to use the Google Keyword Planner (which is a pain to sign up for) either, so you’re welcome.
Without using a plugin, website, or tool, you can mine keywords right from inside Google search results! Yup, it really is as simple as seeing what words people are searching for, and writing content specifically for those words.
The only thing you need is to know the search volume (how many users search for that keyword per month) and the competition (how difficult it is to rank in Google for that keyword).
For that, you can use some free keyword search tools, like UberSuggest. As you grow as a blogger, and expand your understanding of keywords, you can start using more keyword search tools.
My personal favorite is the Keywords Everywhere Chrome extension, this used-to-be free, but now paid extension serves up results right in the Google results page. It’s quite affordable, I spend $10 on credits almost a year ago and I’m only about 50% through them.
Consider the following factors when choosing a keyword:
- The right keyword phrase that’s 3 to 5 or so words
- With a decent search volume that says 200 to 2000 or so (anything higher you’ll probably not rank for)
- Doesn’t have a giant media outlet like Forbes or Times ranking for it
Once you’ve chosen your primary keyword you also want to note any related keywords and similar searches too. When you write your blog posts you’re going to use them each organically in your sentences and headings.
✔️ B: Add Your Keywords to Your Content
Wasn’t that so simple? Now all you have to do is optimize your content by adding your keywords.
The first place is to make sure it’s in your blog post title. To choose the best title you can refer to ranking blog posts in Google (you want yours to stand out and be different) and use the Free Coschedule Headline Analyzer. Fill out your details to get access.
The easiest way for a beginner blogger to learn how to add keywords to the body of their blog posts is with the Free Yoast SEO plugin for WordPress.
Install and activate it, then from the Post or Page Editor, scroll to the bottom and enter your keyword and follow their advice for how many times to use it.
I will say that the Yoast SEO plugin isn’t “god” when it comes to SEO, but if you’re completely new to blogging it’s a great way to learn how to write for readability and for SEO.
Do you best to achieve a green smiley face, but honestly don’t stress too much if you’re in the yellow.
Be sure to also mention related keywords in your content as well. These related keywords could also be the focus of future blog posts or other pillar posts.
Continuing with my example from above, related keywords would be “keyword research tools” or “seo keywords examples.”
Those are the basics of search engine optimizing your content as a beginner blogger, for now, that’s all you need to know to get started. Trust me, getting started and writing consistency should be your priority.
4.8 Bonus Tips for Writing Blog Posts
It’s important to remember when you’re writing blog posts that you are writing blog posts, not essays or a novel. What does this mean?
- When writing, keep your sentences short, and use language that is easy to understand.
- Make sure your paragraphs are only two or three short sentences long.
- Or if you’re writing comprehensive sentences, one long sentence per paragraph.
You want your content to be easy to read on any device, and long paragraphs can be overwhelming on mobile. And news flash, the majority of your readers will be accessing your blog from mobile.
That’s not all, you also want to make sure you use lots of headings and subheadings to not only break up your text, but to act as a guide for those speed readings and looking for specific answers.
- You also want to use numbers and lists where appropriate, as it just makes it that much easier to read.
✔️Just Use Grammarly
If you’re a beginner blogger that’s struggling with writing, using tools like Grammarly but also having the Yoast SEO plugin activated will help you improve your readability score, another important factor for SEO.
The best part about using Grammarly is that as long as you have the browser extension, it integrates with the WordPress post editor, so you can make corrections as you type your blog posts.
It’s also a great idea to include images and graphics in your content that enhance and accentuate your subject matter. Especially, if your blog posts are technical or complicated in nature, having images helps to make it that much more accessible.
4.9 Creating Graphics and Finding Stock Images
When starting a blog one of the most common questions beginner bloggers have is about creating graphics and finding images. You might wonder, do I need to hire a graphic designer or start paying for Adobe Photoshop?
You can rest easy, finding the perfect image for your blog post, and being able to design awesome graphics that don’t have to cost you. You can get started for free!
Although your words are the foundation of your blog posts, your images are important for grabbing and keeping your readers attention. No one wants to feel as if they’re reading a 500-page novel, while they’re reading a blog post.
Luckily, there is a multitude of free stock image sites dedicated to helping you find the perfect image. If you want to start a blog for cheap, it’s silly to start out by paying for stock photos.
However, it is worth noting that with so many bloggers using the same free stock images there are benefits to find less-known sources or purchasing an affordable yearly or monthly stock photo membership.
Let’s discuss your best options for finding free or cheap stock photography for your blog.
Free Stock Photo Sites
Ready to find the perfect image for your blog post? Welcome to the ever-expanding world of free stock photo sites.
🛑 I would be remiss to not warn you to always read the copyright and photo release on any website before using images. It’s your responsibility to double-check that these images are free for use, in the way you intend to use them.
Here are some of the most popular free stock photo sites:
Can’t find anything you like here? Or looking for unique yet still affordable stock photos? Then a stock photo membership is likely an affordable alternative for you.
Affordable Stock Photo Memberships
Instead of paying per photo on traditional paid stock photo sites like Shutterstock, stock photo memberships offer a more affordable rate. For more affordable stock photo packages, check out Deposit Photos or the suggestions below.
Most offer monthly and yearly membership fees, with the yearly fee working out the cheapest per image.
IvoryMix – $137 per year for unlimited downloads
IvoryMix VIP Membership offers 4500+ photos and graphics, with new images and social media quote graphics being added monthly. Plus, just like free stock photo sites, you can search for images based on color or theme.
The yearly membership works out to $11.41 per month. You can also join with the Elite Quarterly plan for just $52 per quarter, getting access to 4500+ photos and graphics.
A feature for IvoryMix that I appreciate is that you can use their stock for client work as well. Just remember to read the photo release and terms of use.
PixiStock – $187 per year for unlimited download
If you’re also looking for graphics, Instagram-ready quotes, and Lightroom presets, PixiStock is the perfect membership for you. The annual membership grants you access to 3500+ stylish stock photos, plus access to 1100+ Canva graphic templates and Instagram quotes.
When you sign up annually it works out to $17 per month. The monthly plan only includes stock photos and is $37 per month.
You can also search by color or theme to help you find the perfect styled stock image.
Scopio – $29 per month for unlimited downloads
After spending time on stock photo sites, you’ll start to wonder why everyone and everything looks the same. Scopio offers diverse and authentic photos of real people. For $29 per month (or $23 per month on a yearly plan), you can download unlimited photos.
This growing collection of stock photos gives you unlimited downloads of royalty-free images you can use anywhere. Plus, new images are added everywhere from photographers all over the world.
Adobe Stock – $29.99 per month for 10 photos
If you’re looking for images comparable to Shutterstock quality, then Adobe Stock is an option for you. For $29.99 per month, you get access to ten stock photo downloads.
Adobe Stock is a great option for you if you’re in non-traditional niches and have trouble finding high-quality images on the free stock photo sites. Plus, if you sign up with this link, you get ten free stock photos.
If you’re looking for unlimited downloads and bonuses like graphics and mockups, IvoryMix or Pixistock are the memberships for you.
Most monthly membership sites also offer massive discounts around Black Friday and major US holidays. You can also sometimes find amazing stock photo deals on the AppSumo store or Entrepreuer Store (get $10).
4.10 Graphic Design Software for Bloggers
Whether you’re excited or dreading designing graphics for your blog, it’s a lot easier than you think to get started. Thanks for free, online-based graphic design software you can create stunning graphics in no time flat.
Plus, with free or paid templates, it’s even easier to get the desired effect you want.
My number choice for beginner bloggers is Canva, a free graphic design tool with perfectly sized templates for every blogger’s graphic design needs. From social media posts to blog post images or freebie, Canva has all you need.
Plus, for just $9.99 per month, you can upgrade to a paid plan that allows you to do more like import your own fonts. But, no need to get ahead of yourself, get started with a free Canva plan right at Canva.com.
Other Free Graphic Design Software
Canva is by far the number one choice for beginner bloggers, but it’s not your only choice. If for some reason you don’t like it, you’ve got other options like:
However, in terms of free graphic design tool, Canva by far has the most features available to no cost, including a Color Palette Generator and Logo Creator.
Photoshop for Seasoned Graphic Designers
Are you familiar with the Adobe Creative Suite? If and only if you have experience using Photoshop, InDesign, or Illustrator would I suggest you use Adobe Photoshop for your graphic designs.
Although a far superior graphic design and photo-editing program, Photoshop has a steep learning curve and requires a computer or iPad capable of running the software. Remember, online tools like Canva are web-based so no downloading required, but an internet connection is needed.
If you meet these requirements and have the processing power, you can use Adobe Photoshop for $9.99 per month.
4.11 Tips for Uploading Images to WordPress
You might notice that when you start downloading stock photos they are generally quite large in size and resolution. Yes, we want high-resolution images, but we do not want large, slow to load images.
Large files slow down your site, which is bad for user experience. No one wants to wait around for a slow loading site, and Google agrees, ranking slow pages even lower or not at all.
So, how do create an image and video-rich blog posts that load lightning fast? There are a few ways to ensure fast loading with a few free plugins and websites.
✔️ Optimize Image Sizes
Before you upload any images to your site you want to ensure they’re optimized in size. And thankfully there are loads of image resizing websites like PicResize.
If your image is already the right dimension, but still too large in file size, you can use another free site like TinyPNG to shrink the file size.
These types of services typically don’t jeopardize image quality for image size. But be sure to actually look at it before uploading them to WordPress.
✔️ Use an Image Shrinking Plugin
Already uploaded images to your WordPress site? Looking for a hands-off approach to optimal image size? No worries, there’s a free plugin for that called Smush Image Optimization, Compression, and Lazy Load.
🛑 Warning, I do not recommend that you use TingPNG and Smush, as too much compression will lead to pixelated images.
✔️Activate a Caching Plugin
If you’ve followed my advice and started a blog with SiteGround, your new site should already have the SiteGround Caching plugin installed and activated. A caching plugin speeds up the loading of your site by storing a version of your website for easier loading.
Anytime you update a plugin or make changes to your site, be sure to click the “Purge SG Cache” link in your WordPress topbar.
If for some reason you’ve created a website elsewhere, be sure to install and activate a compatible caching plugin.
And that’s it! This was your ultimate beginner’s guide to starting a blog with WordPress and SiteGround.
📝 Your Part #4 Homework:
#1. Set up your blog page and format how blog posts appear on your homepage.
#2. Create a free email address with your hosting provider (SiteGround).
#3. Sign up for an email marketing service like ConvertKit. Then create your first sign up form and integrate it with Genesis eNews Extended.
#4. Set up your contact me page, using a free contact form plugin like Contact Form 7.
#5. Write your about me page, ending it with a call to connect.
#4. Make a simple plan for creating both evergreen and seasonal content.
#5. Update your permalink settings and add the Redirection Plugin.
#6. Find your keywords and get to know a keyword research tool. Then write your first blog posts.
#7. Add an image and speed optimizing tools like WP Smush and a Caching plugin.
FREE Business Planning Workbook
Get the FREE Business Planning Workbook, with everything you need to start or level up your business, including writing your mission, vision, and values statements, setting SMART business goals, market analysis, and product planning.
There you have it! This was your epic beginner’s guide to start a blog.
Congrats on making it through each of these steps. I hope you’re as proud of yourself as I am.
With all the hard work of putting it together behind you, now’s the time to get writing and enjoy the process.
Plus, it’s always a great idea to create a Blog Business Plan.
Want to start a blog, but have no idea where to start? Click here for your ultimate beginner's guide to blogging, with step-by-step instructions.#Blogging #BloggingTips #StartABlog
Ready to start a blog with WordPress and SiteGround?
Last Updated on May 29, 2025

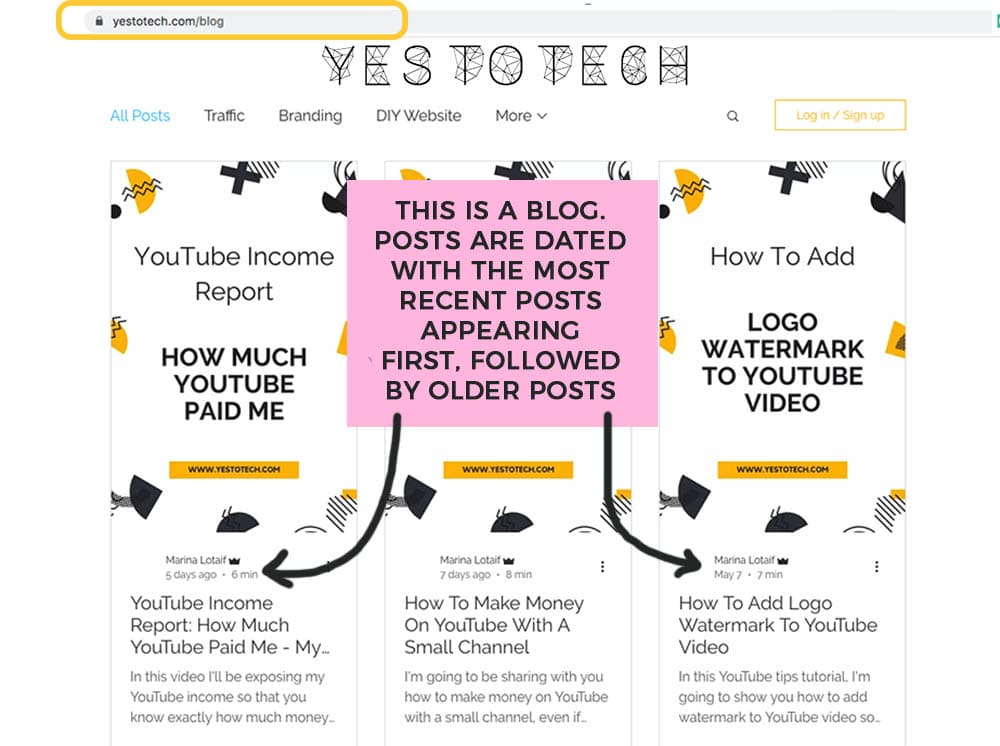
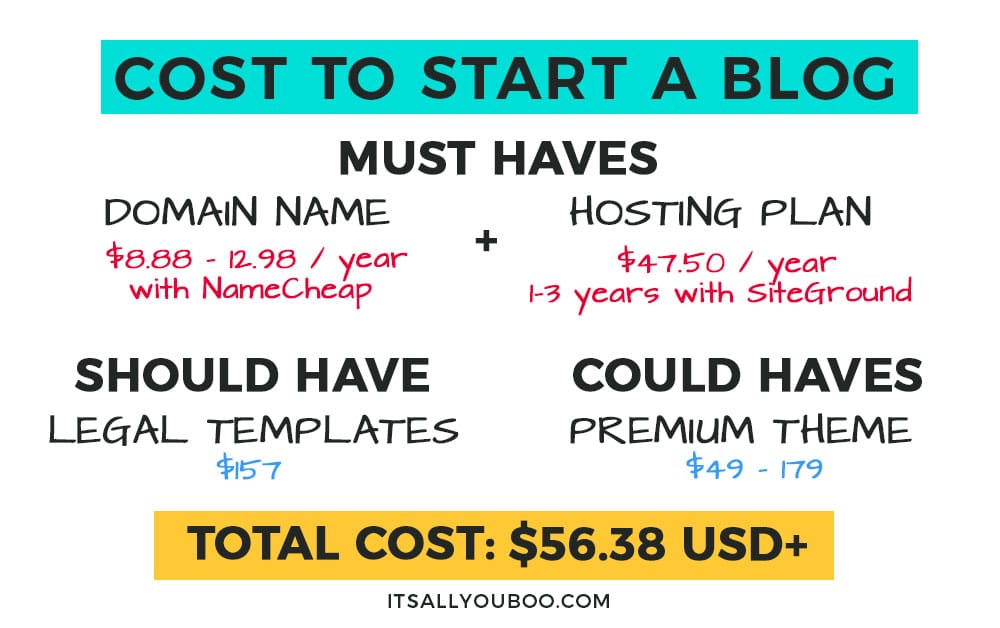


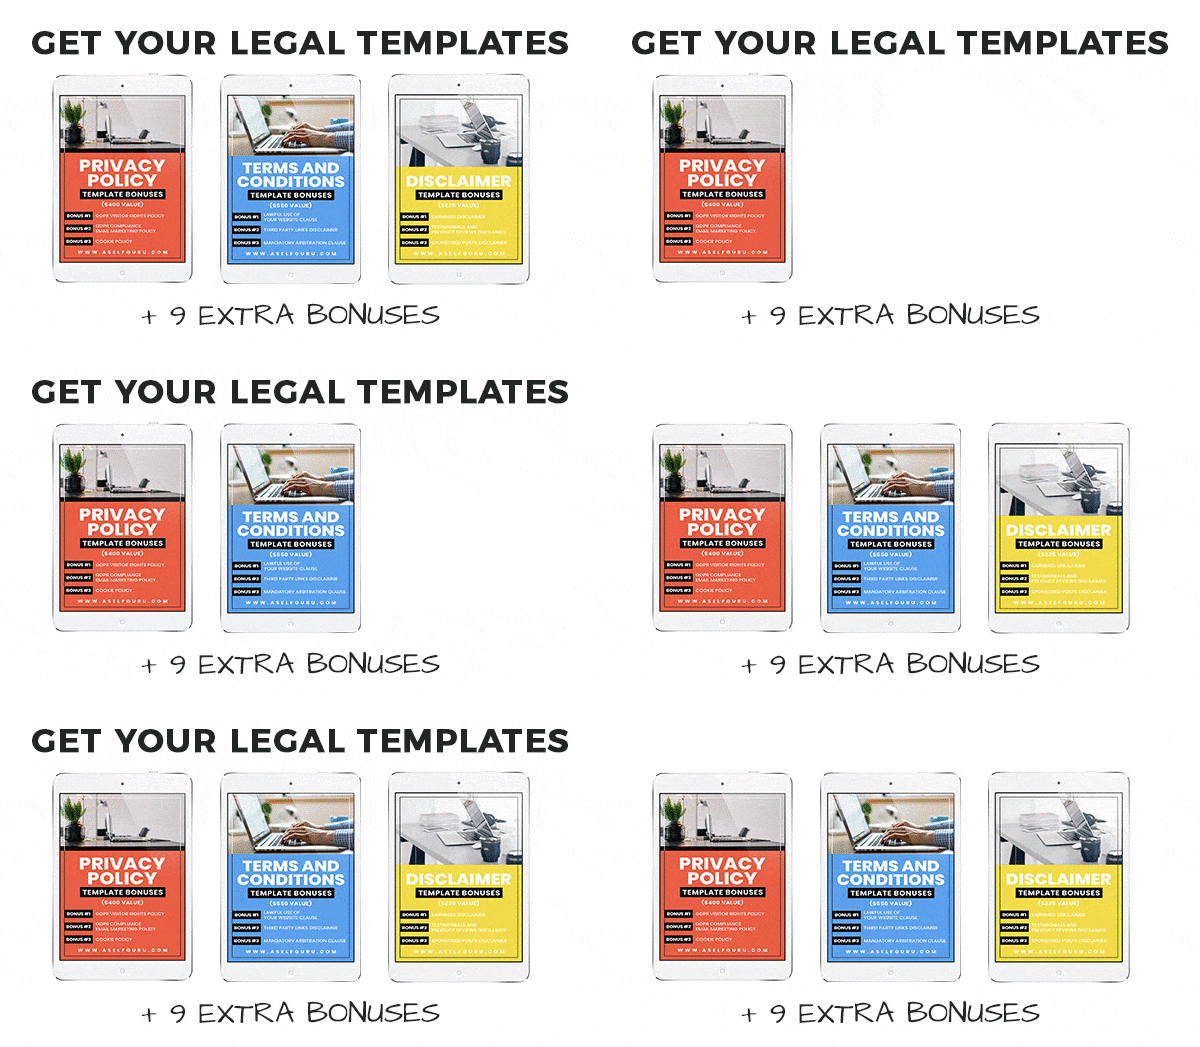
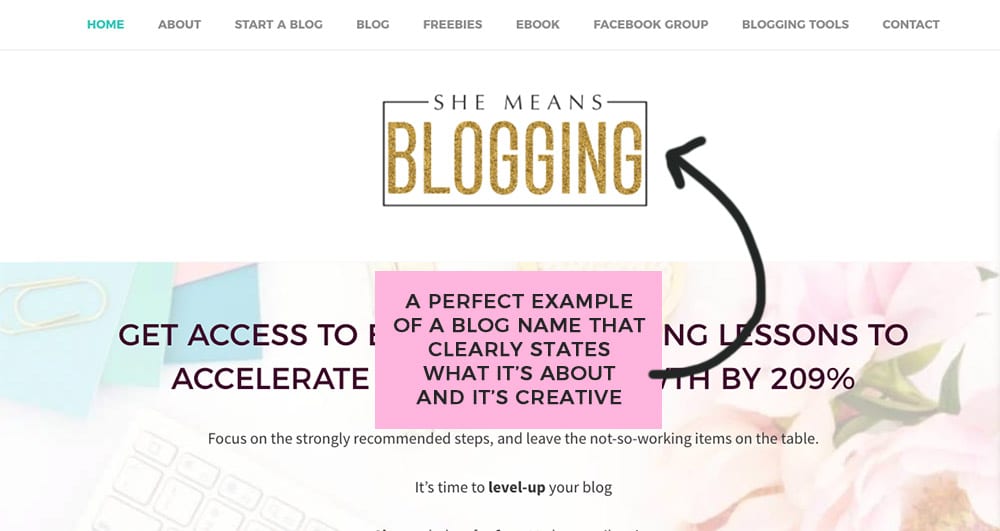


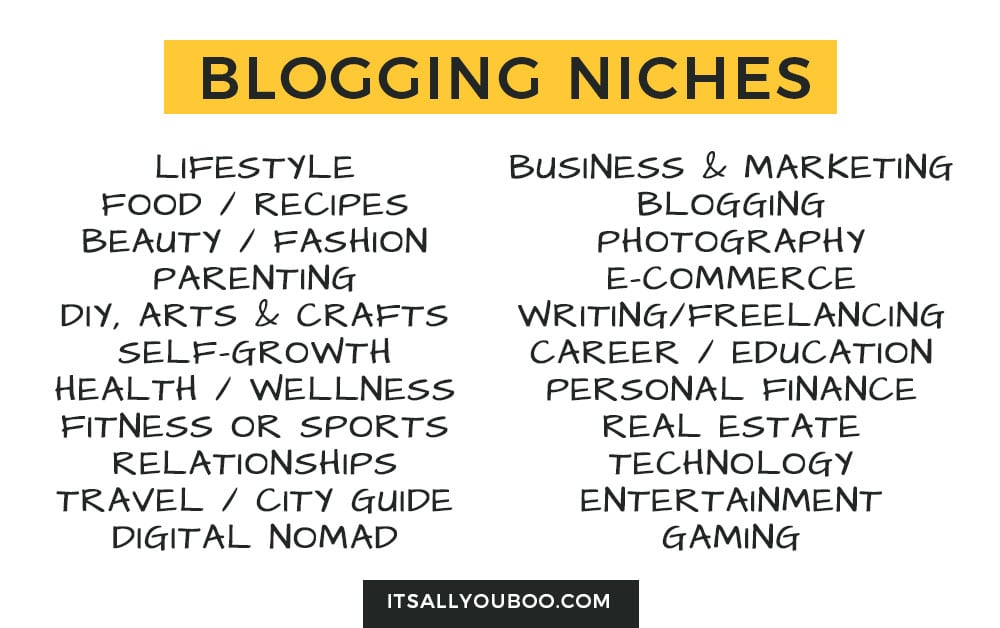
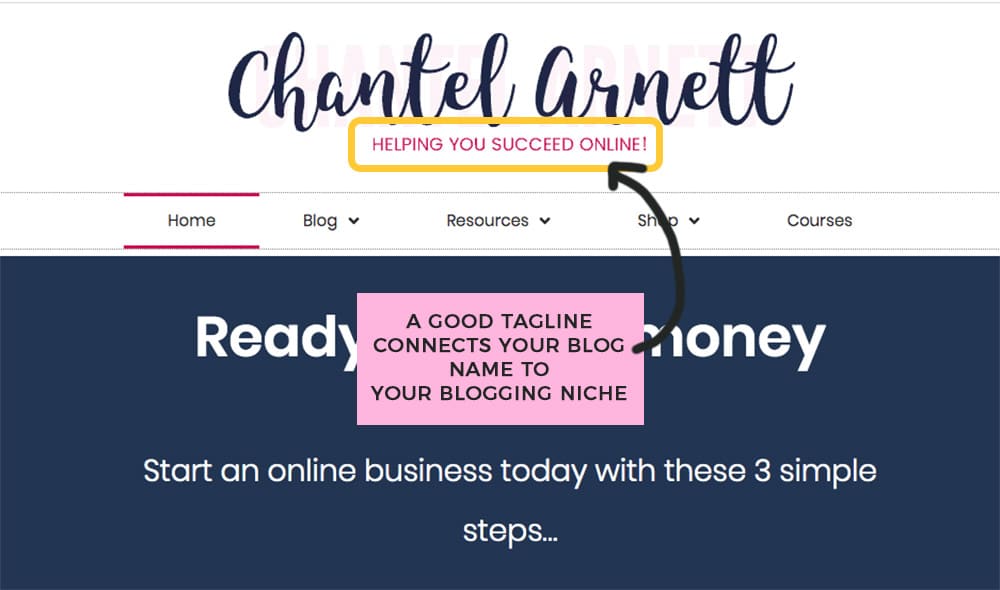

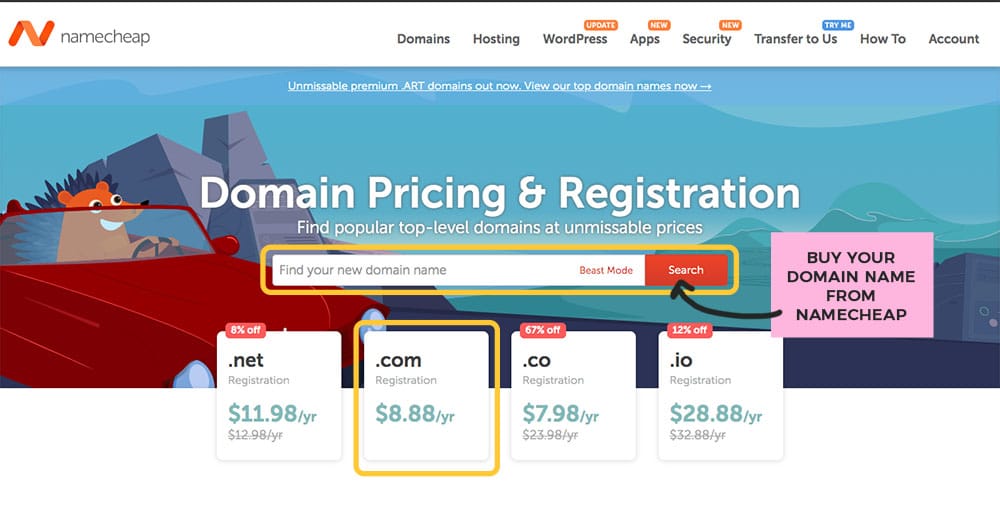
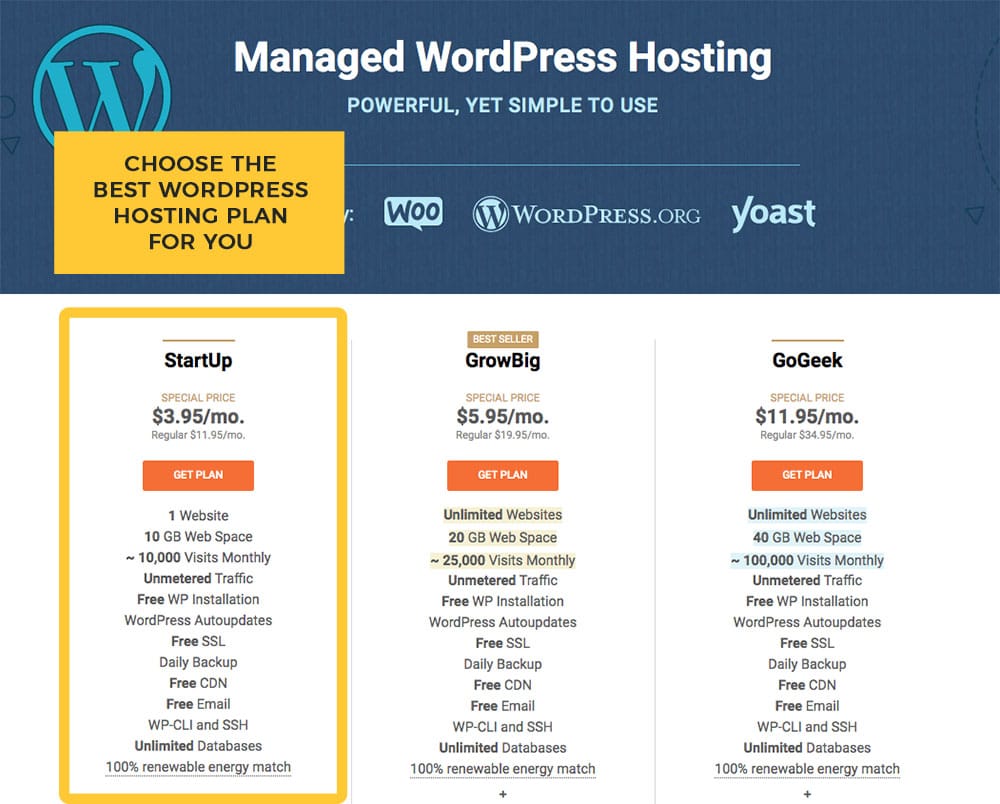

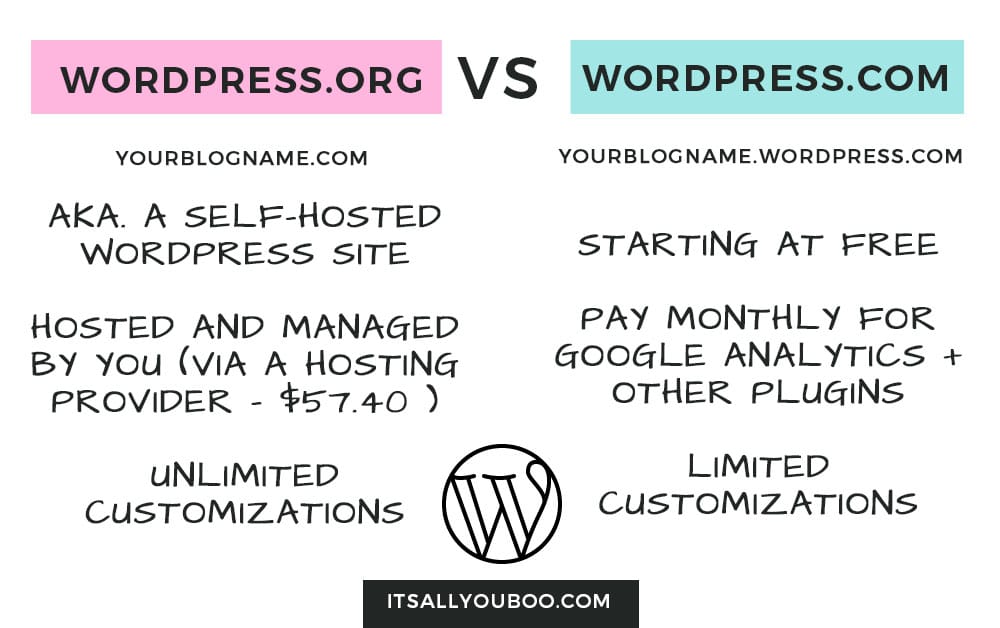
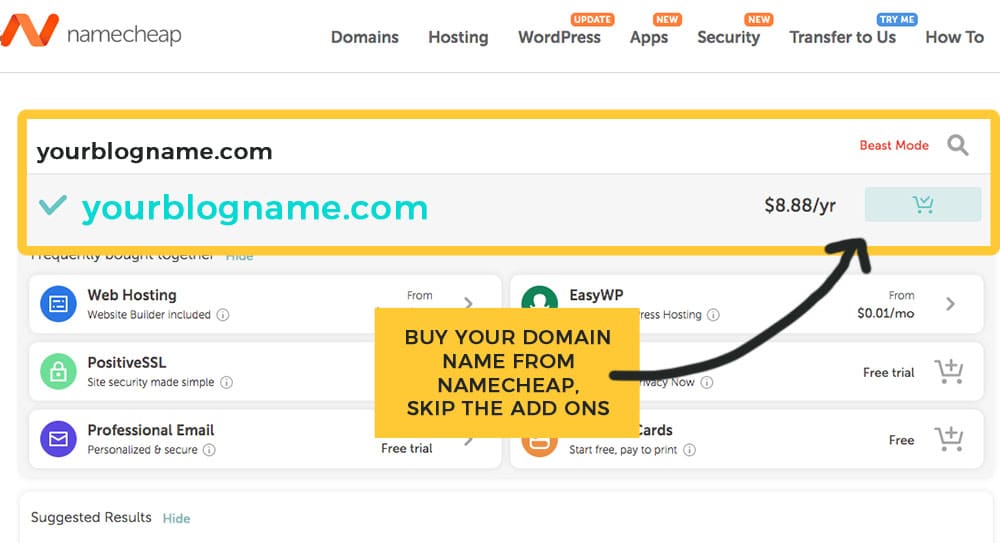
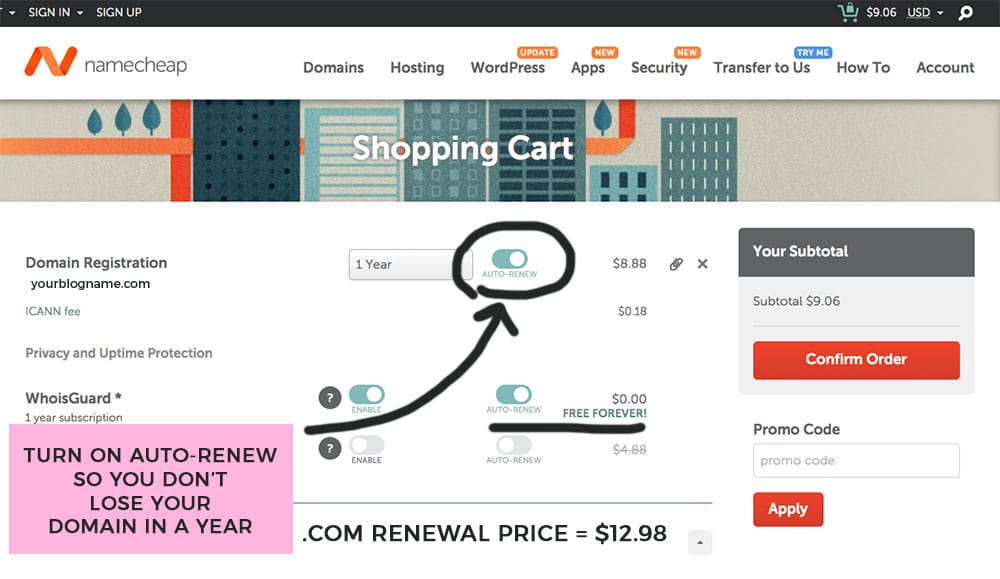
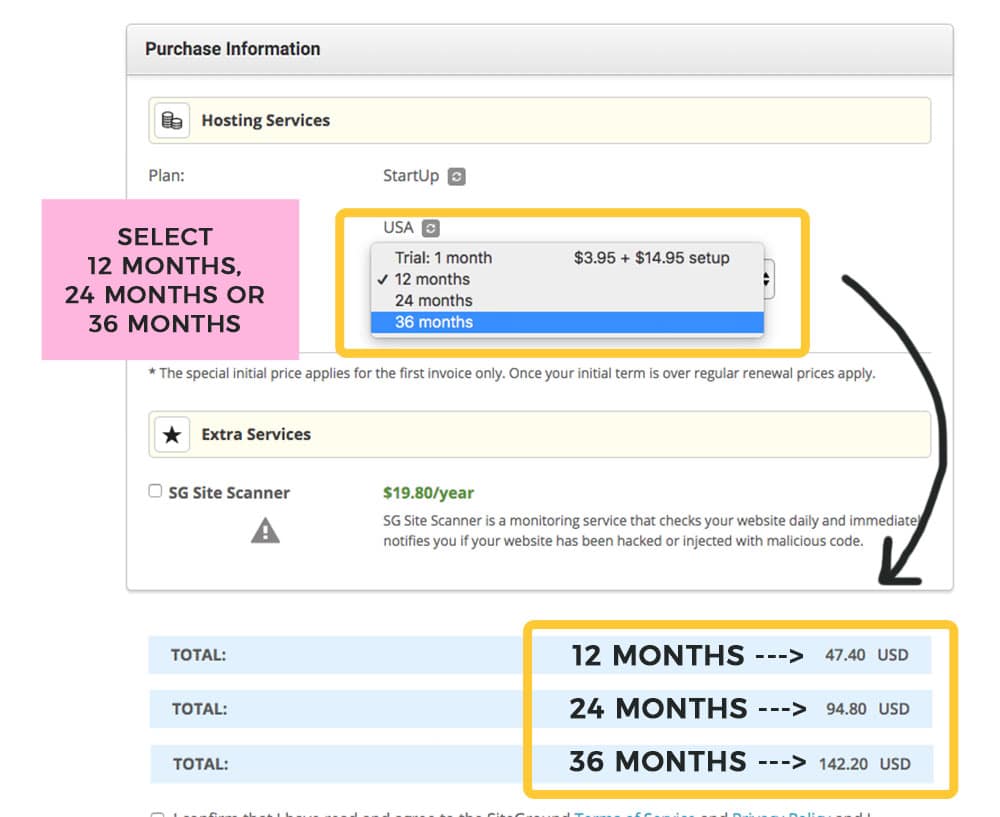
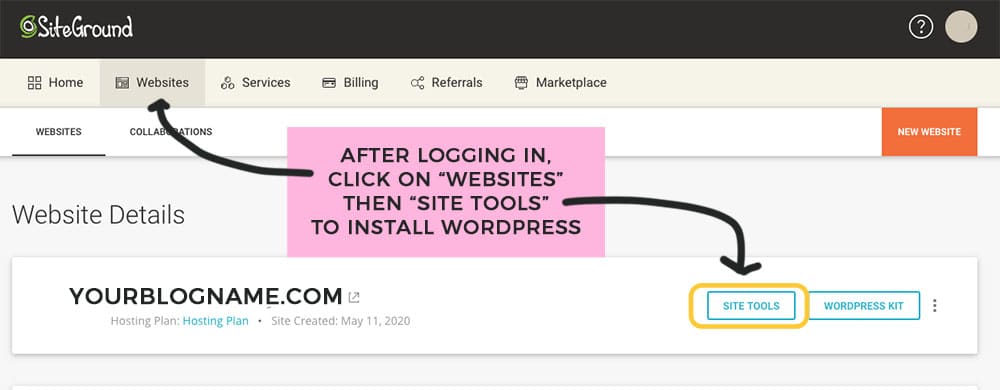
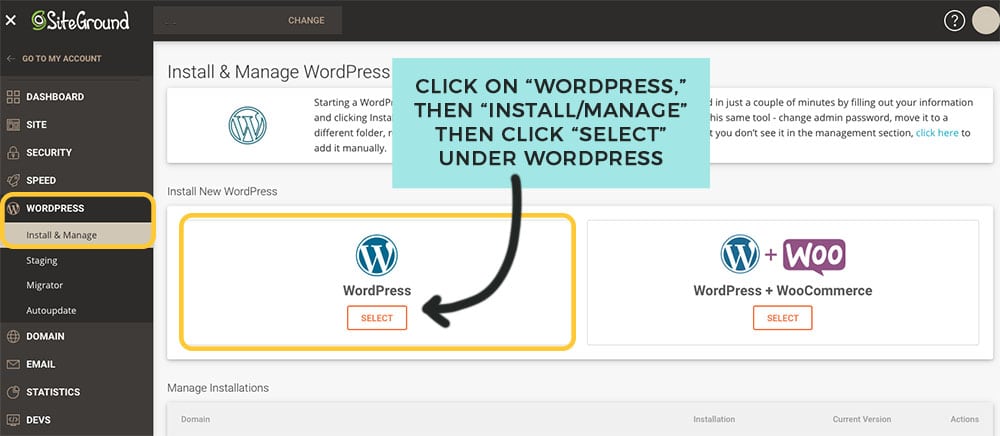
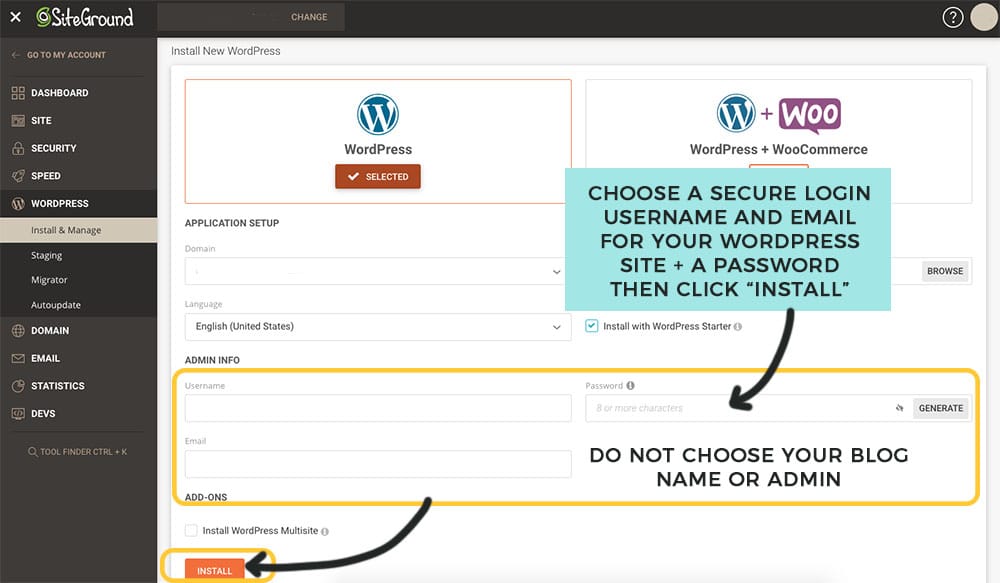
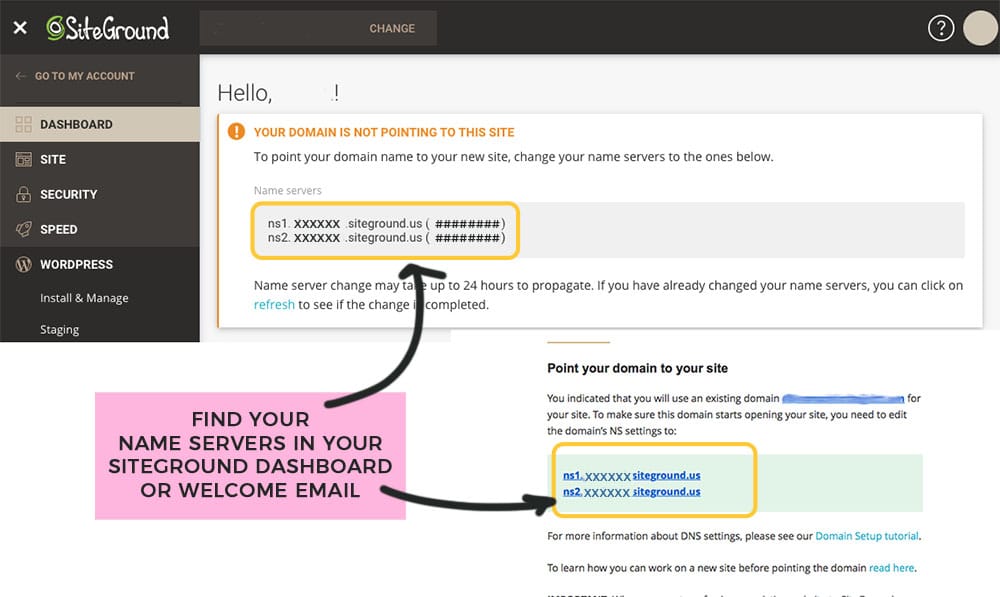
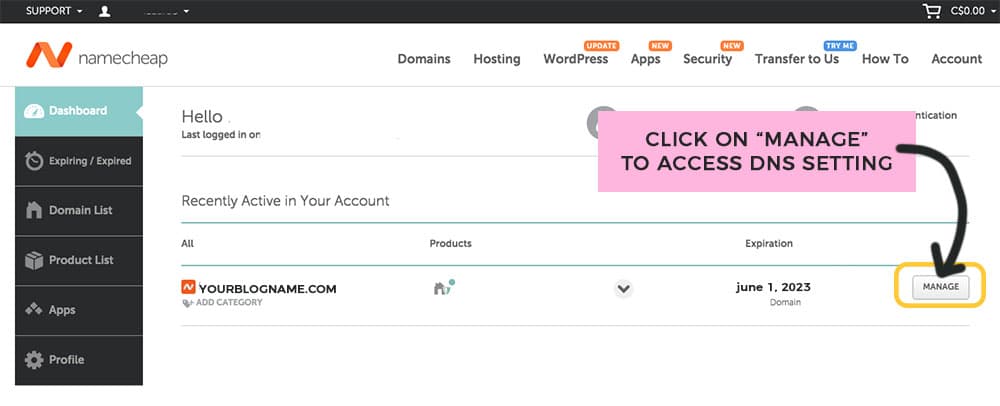
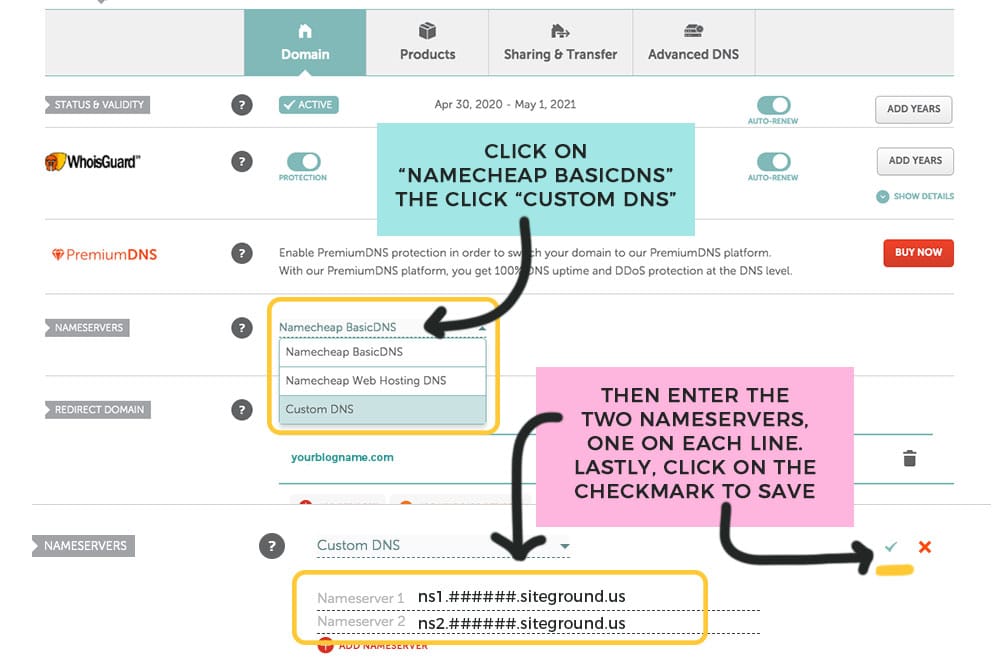
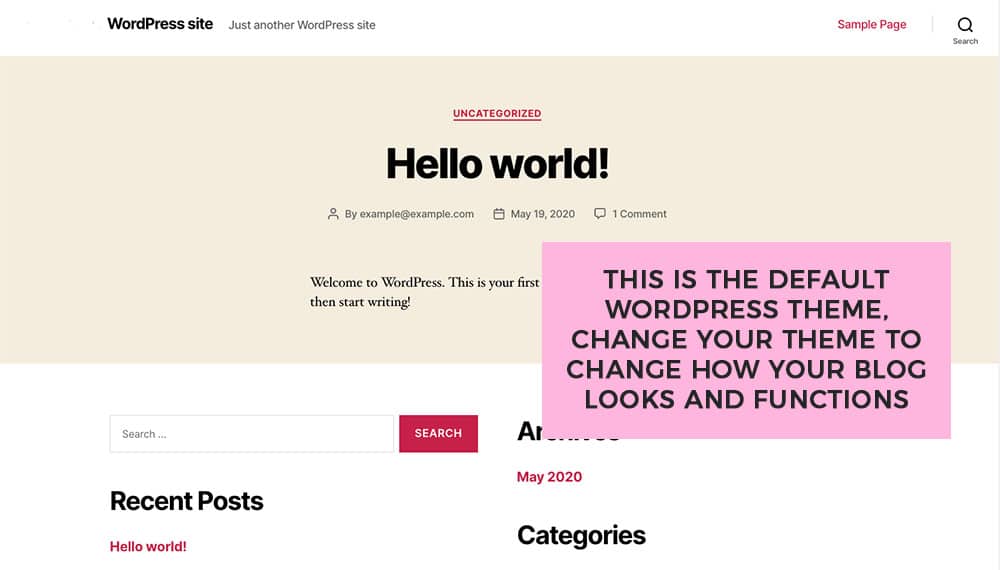
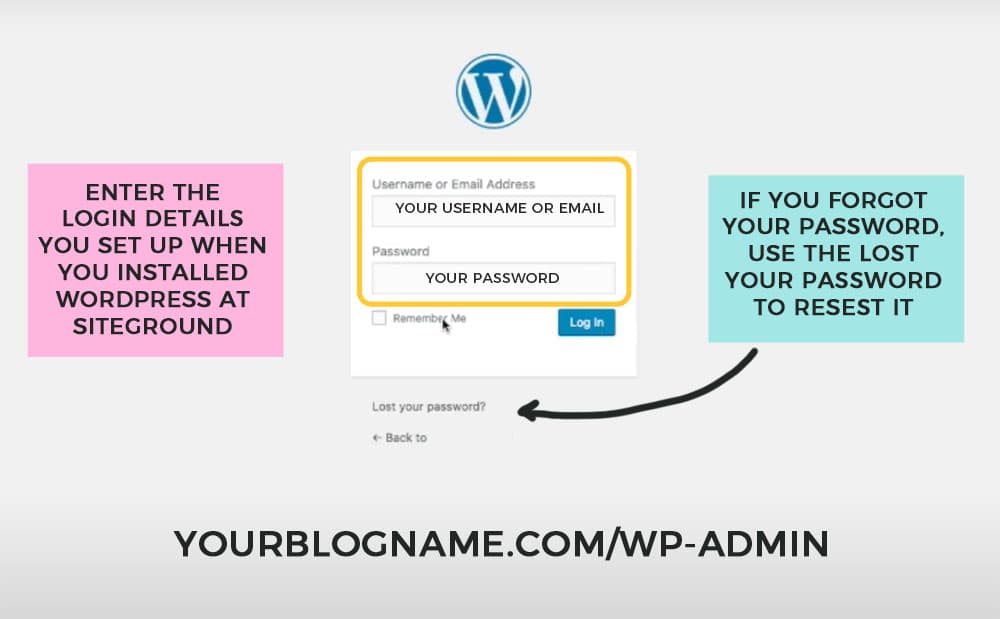
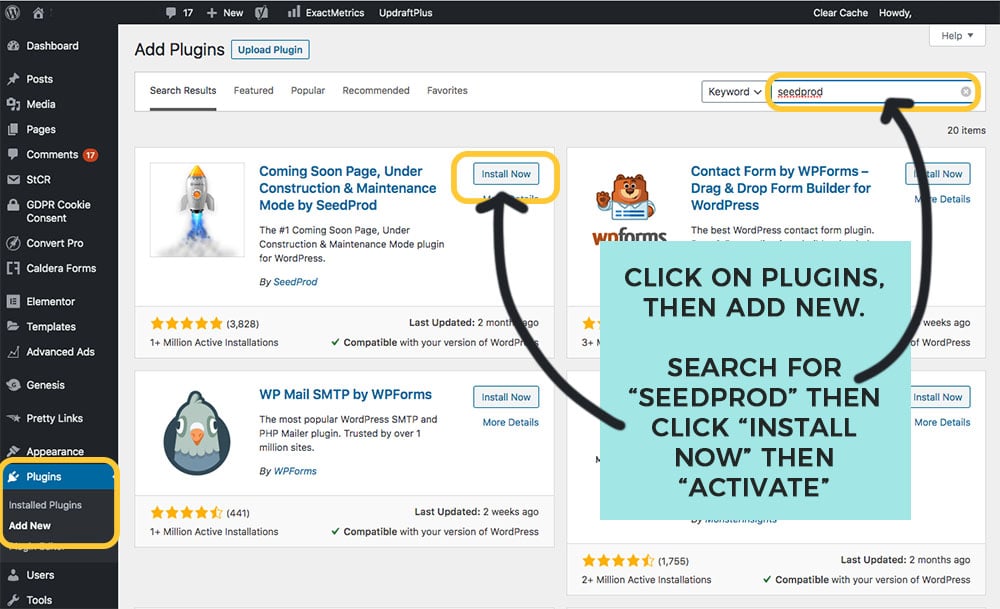
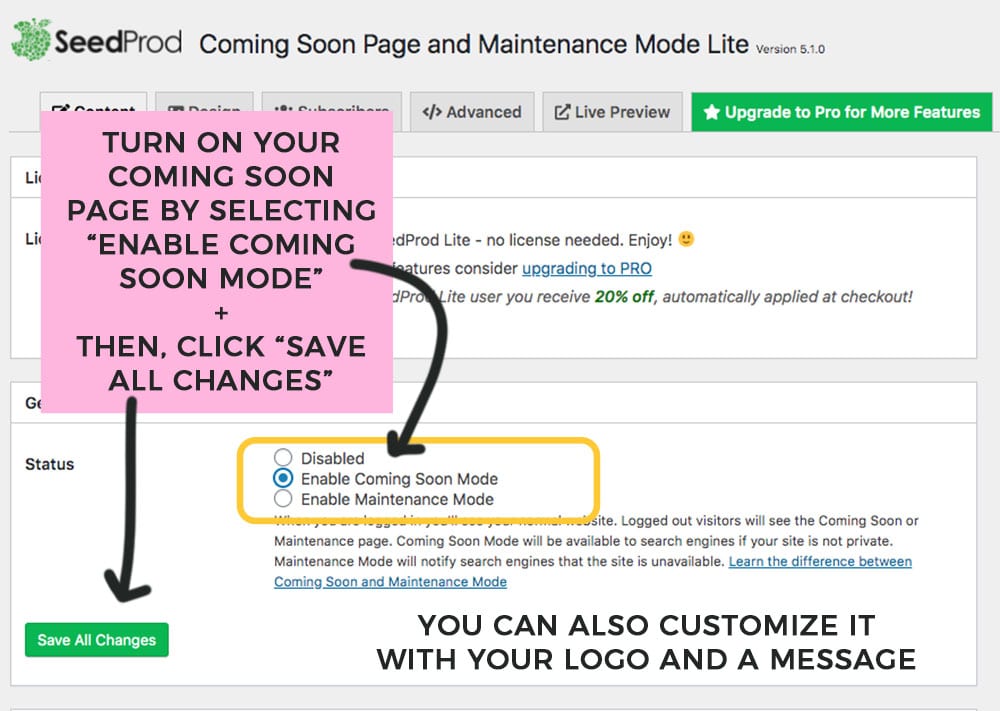
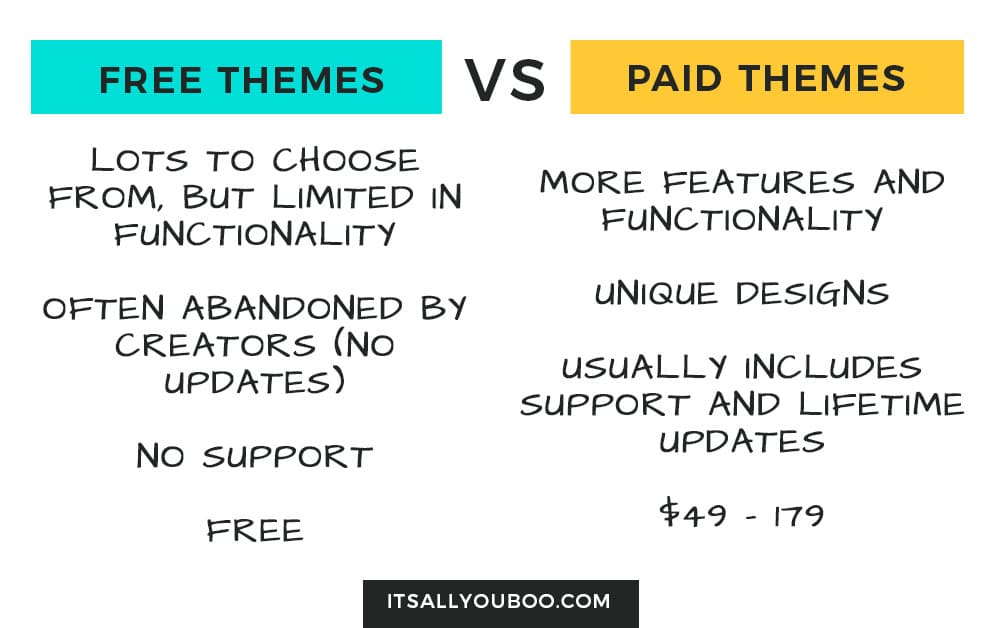


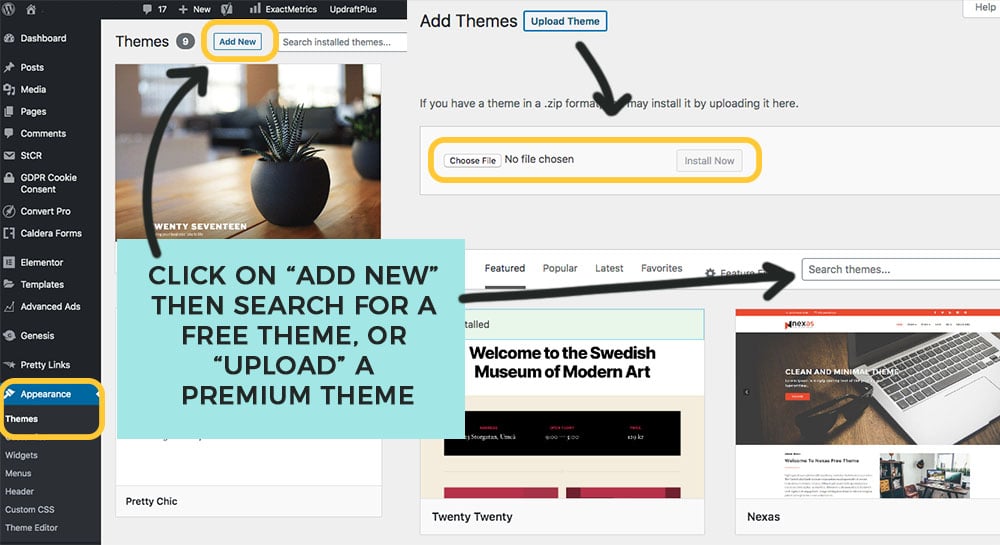
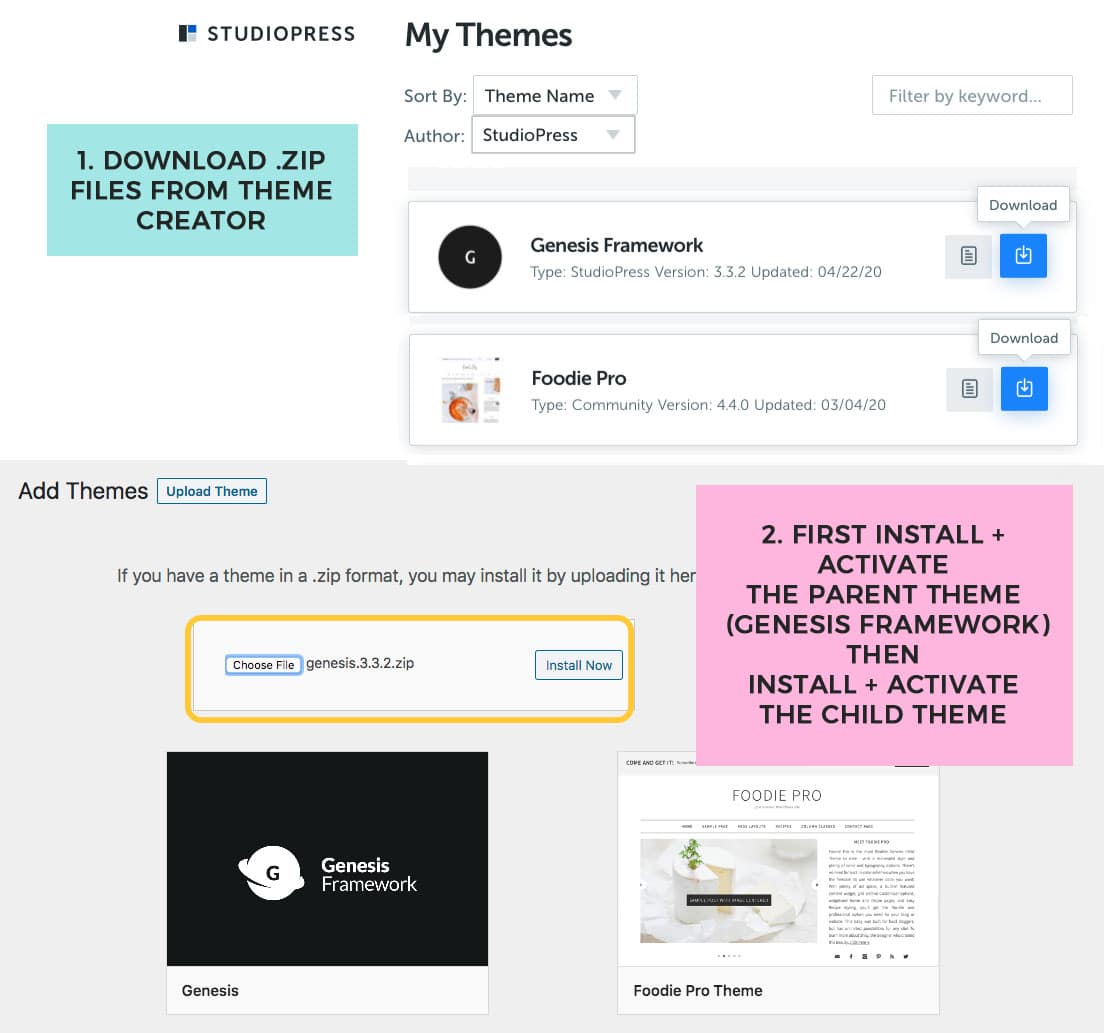
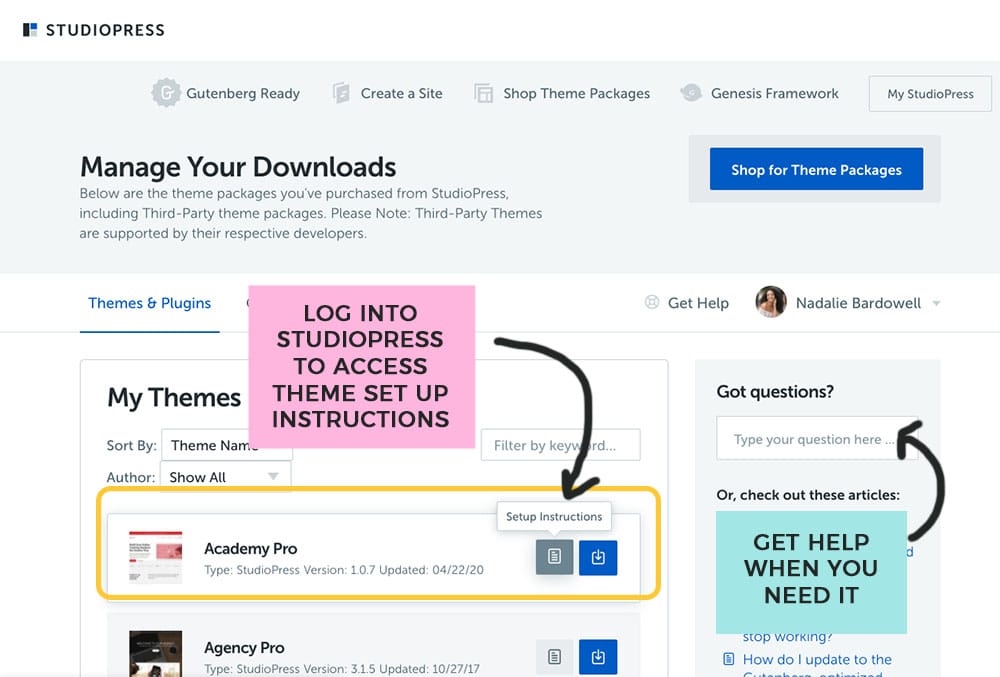
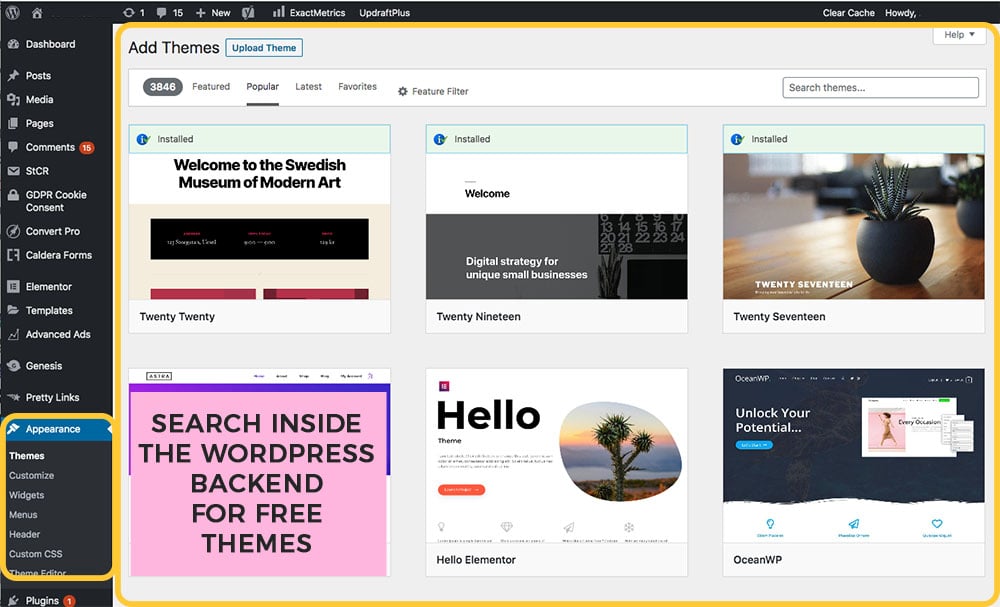
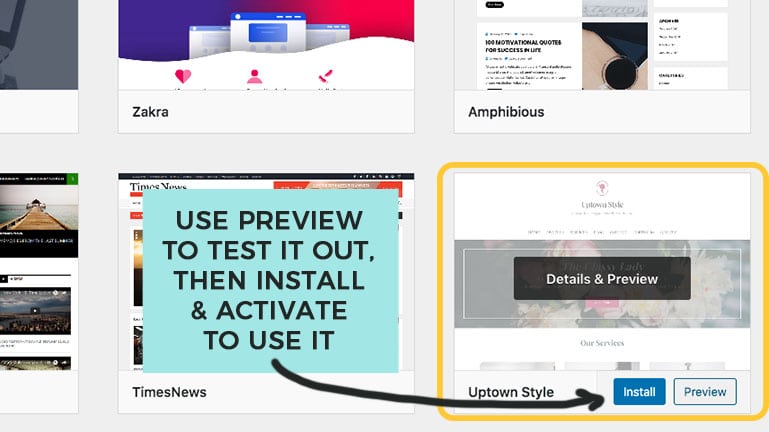
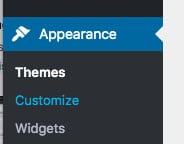
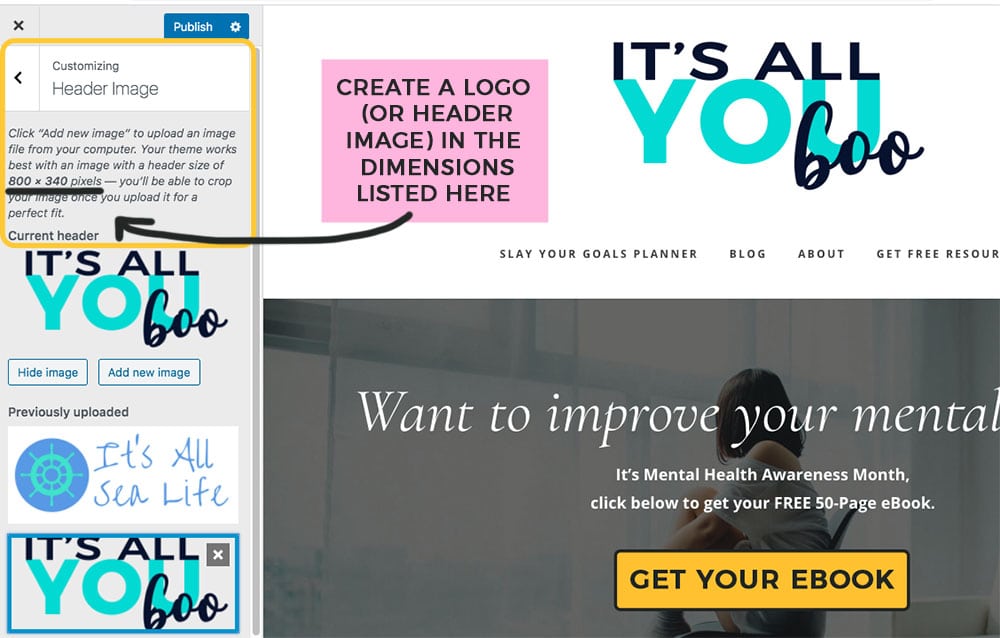
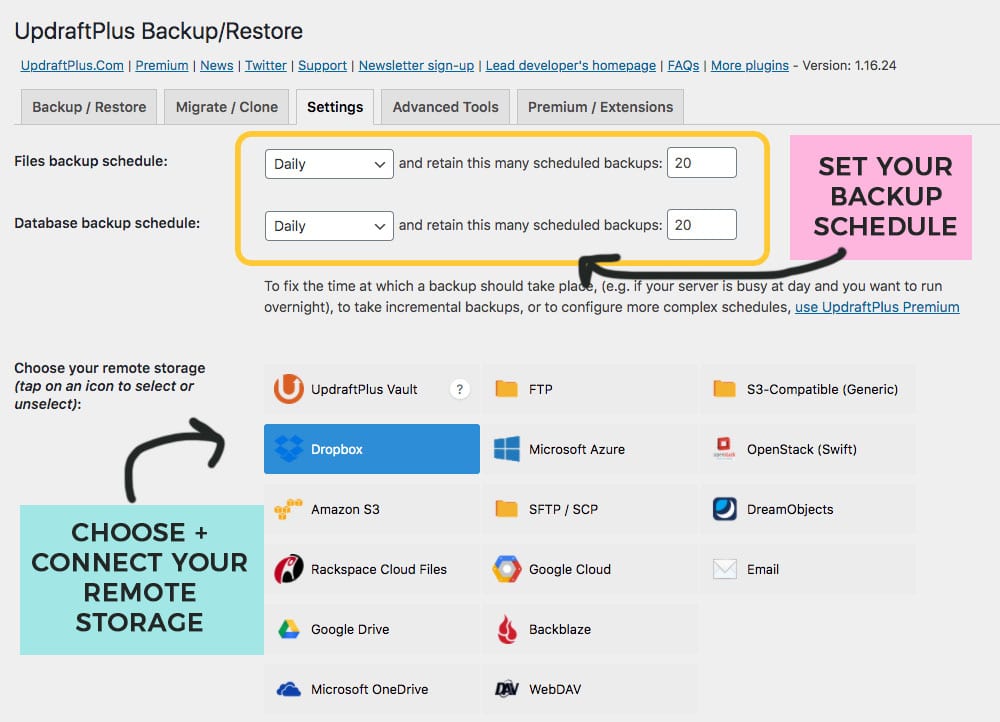
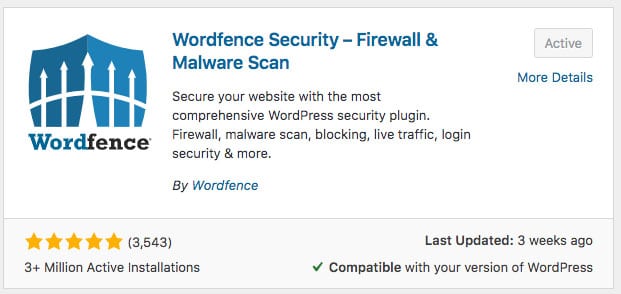
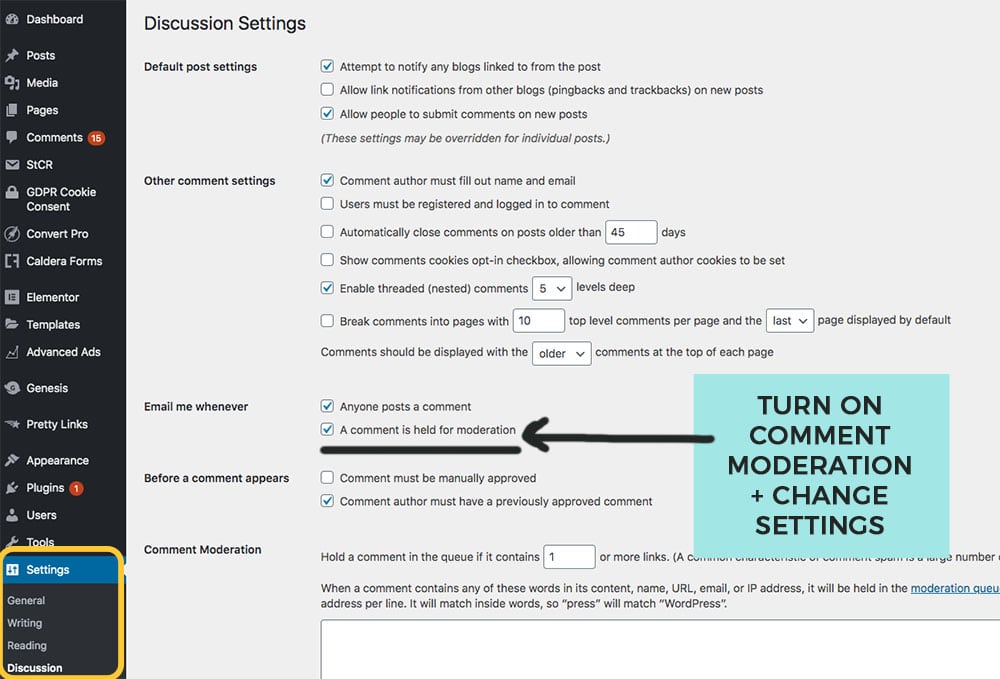
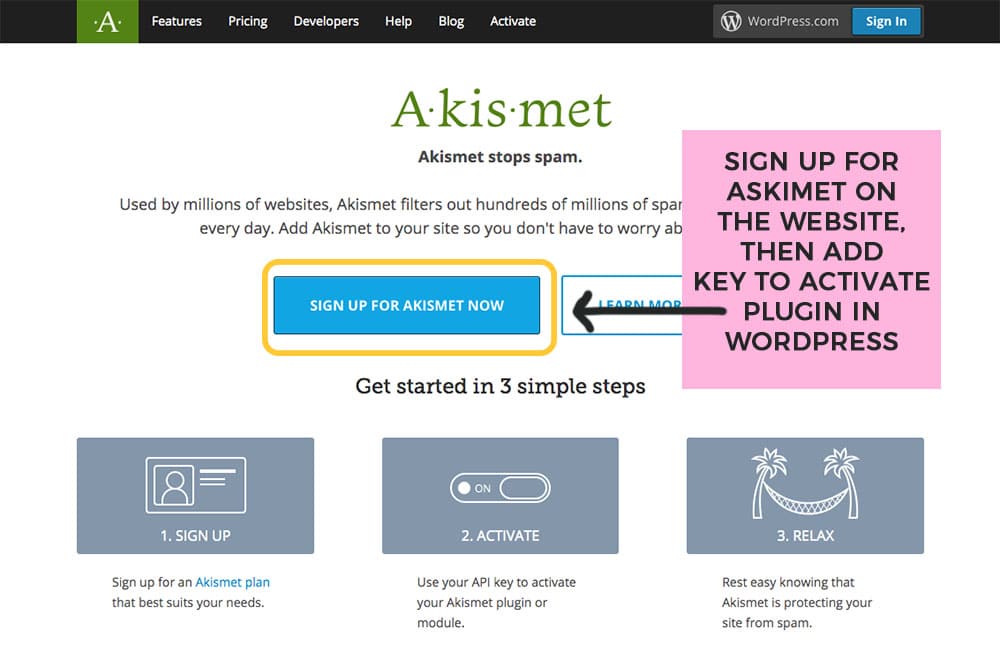
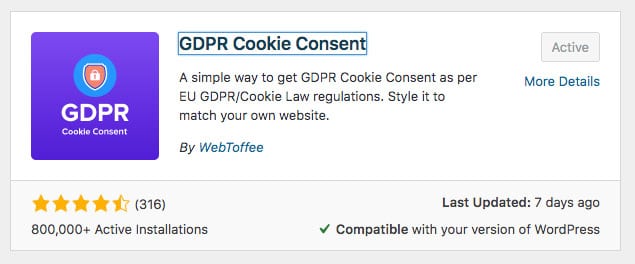

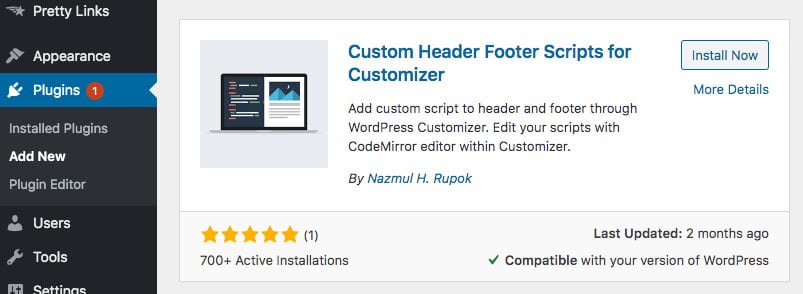
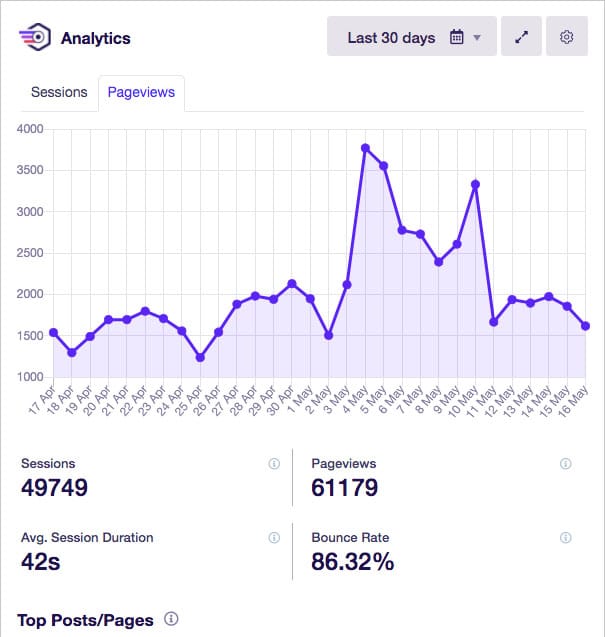
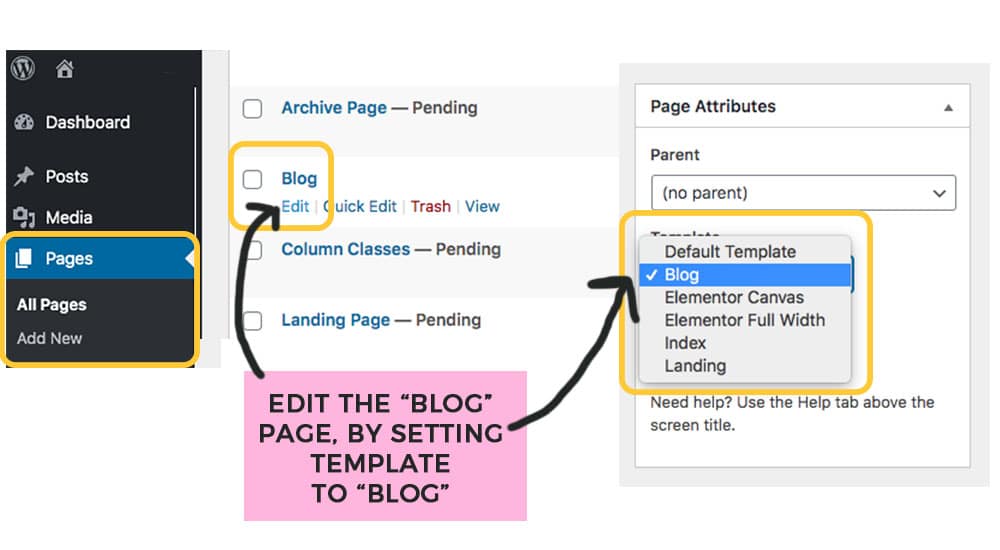
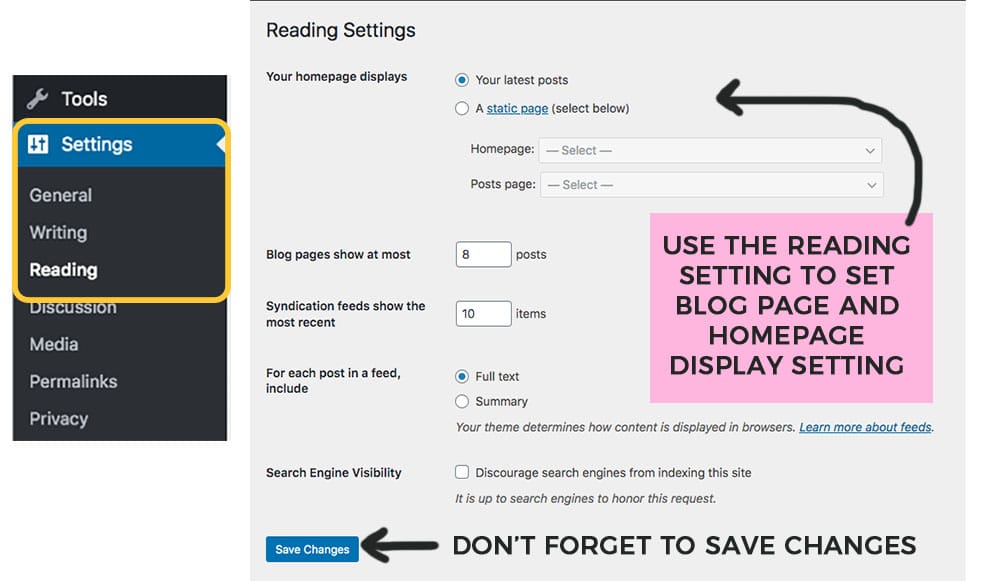
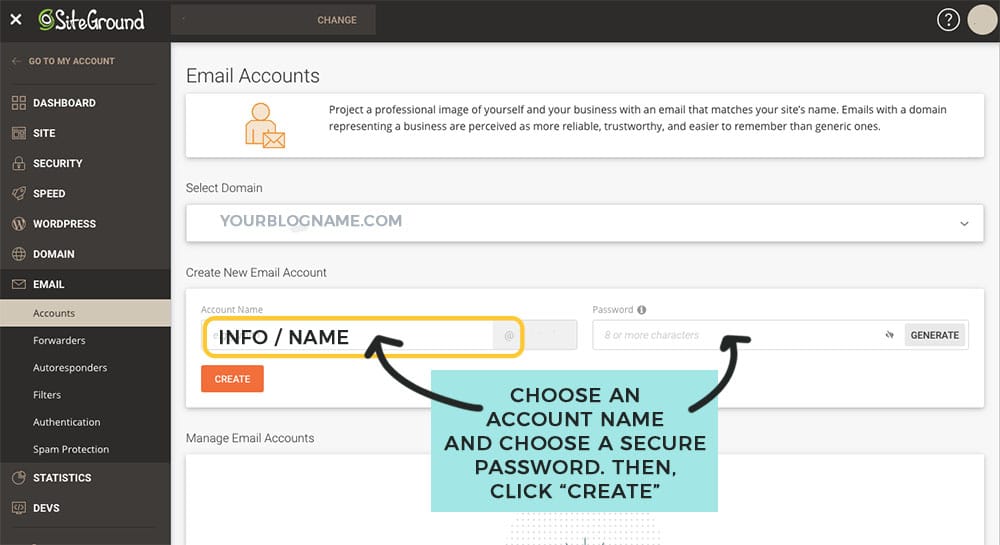
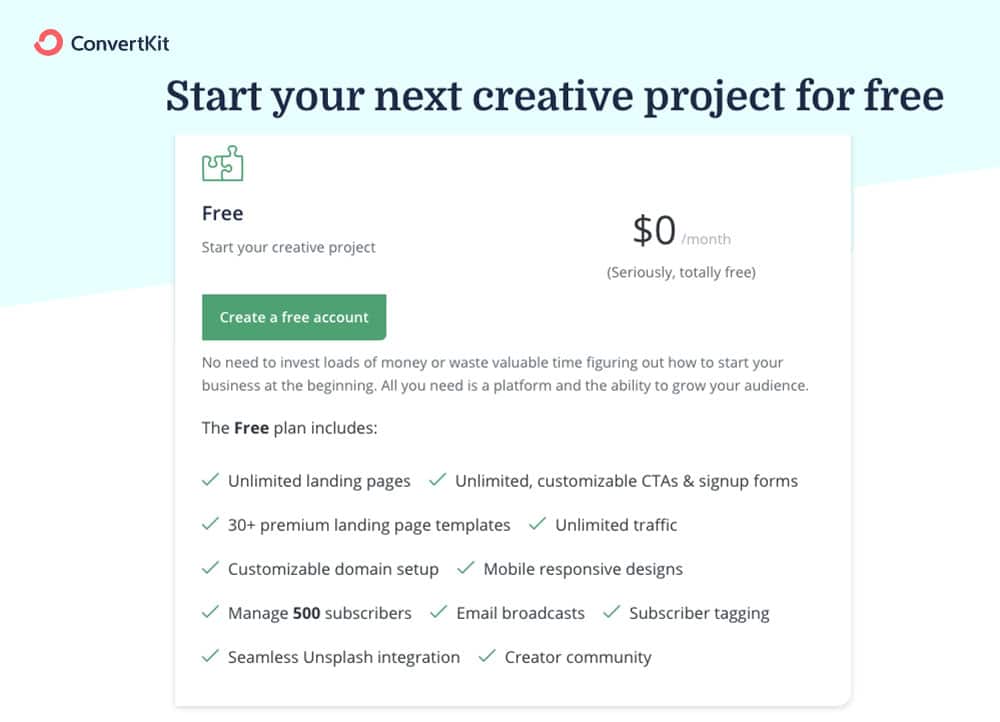
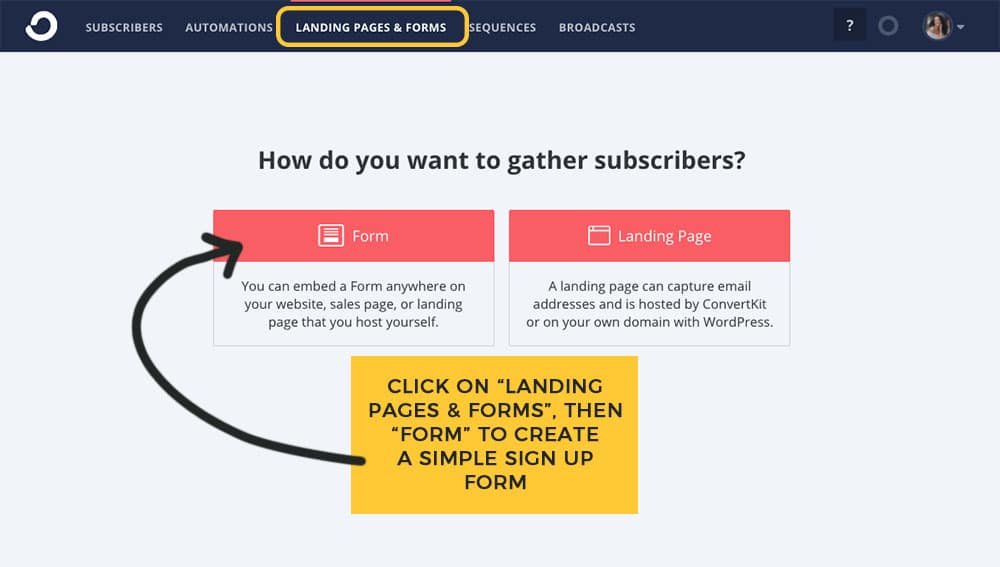
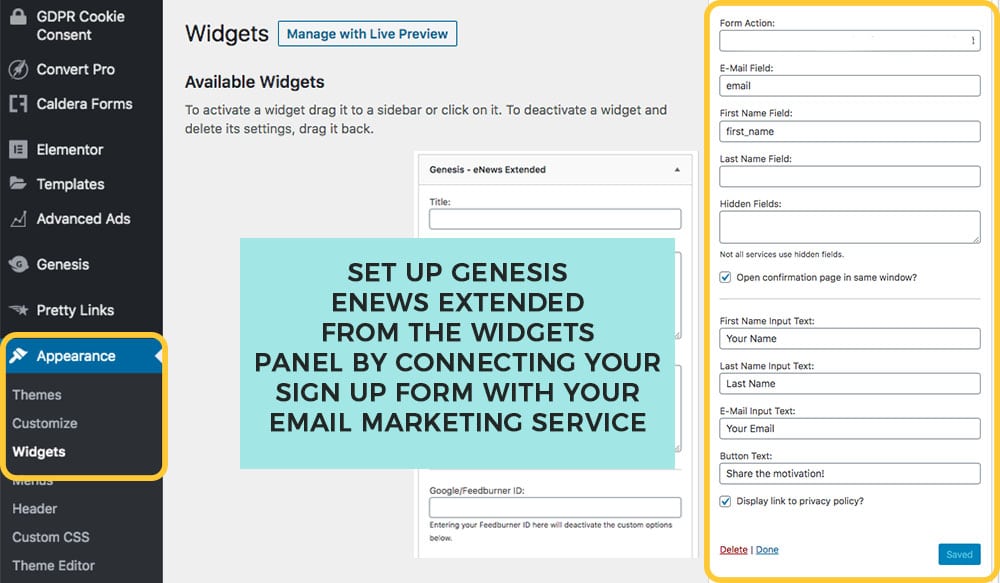
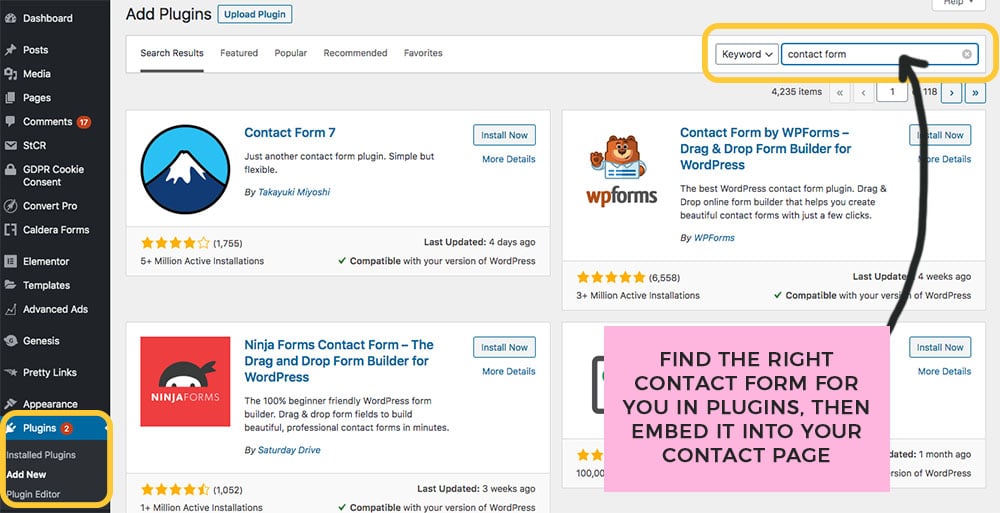
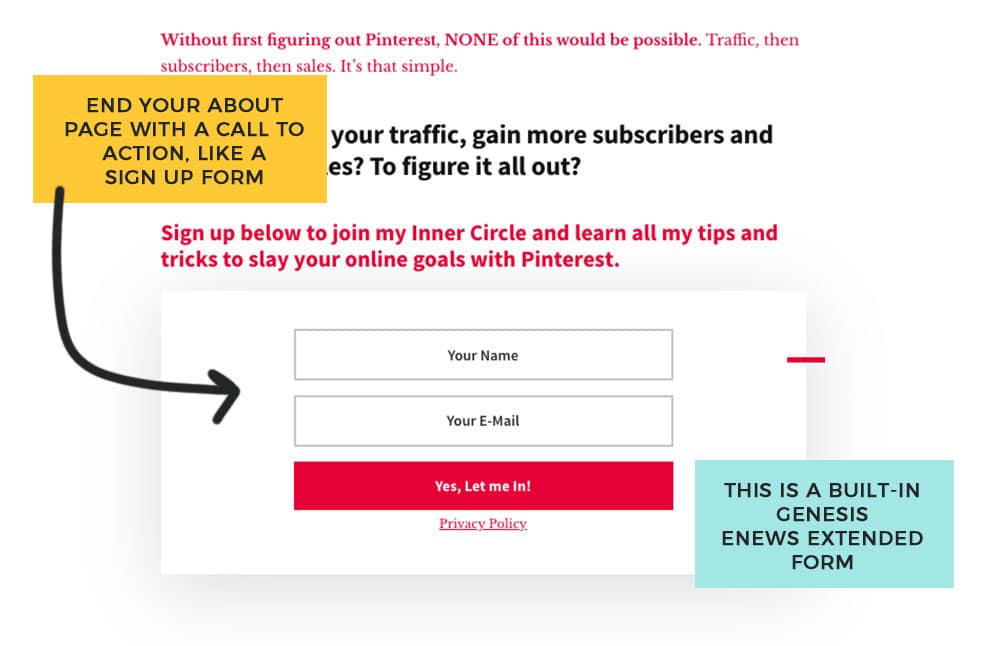
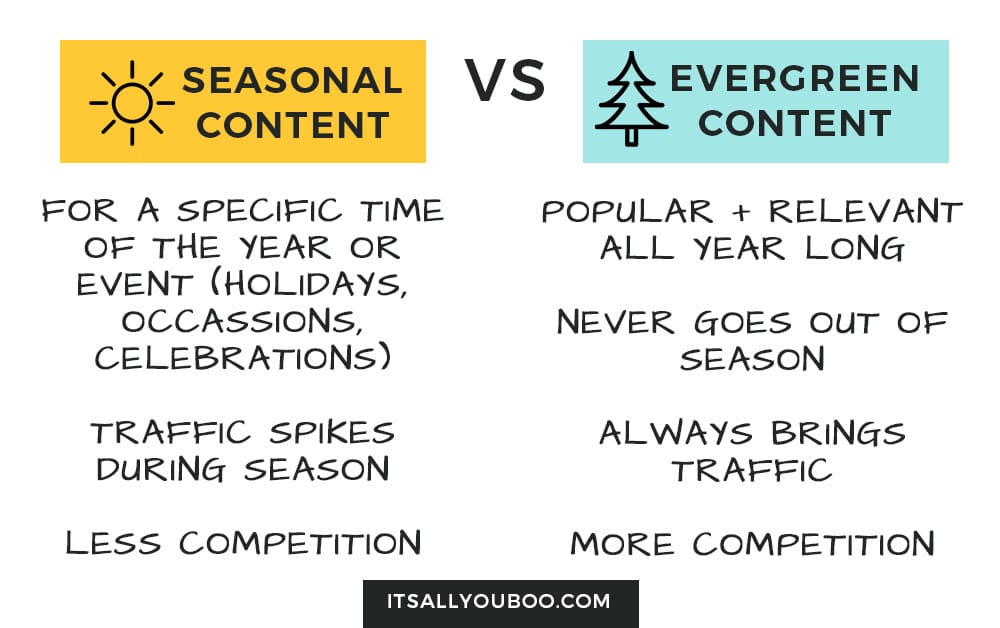
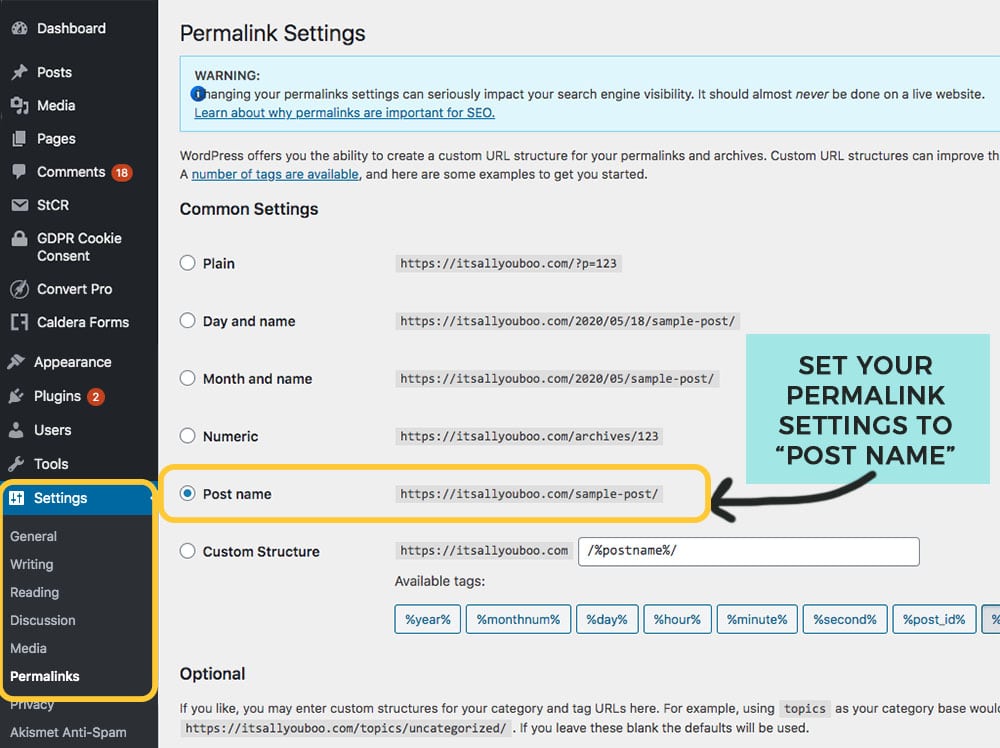
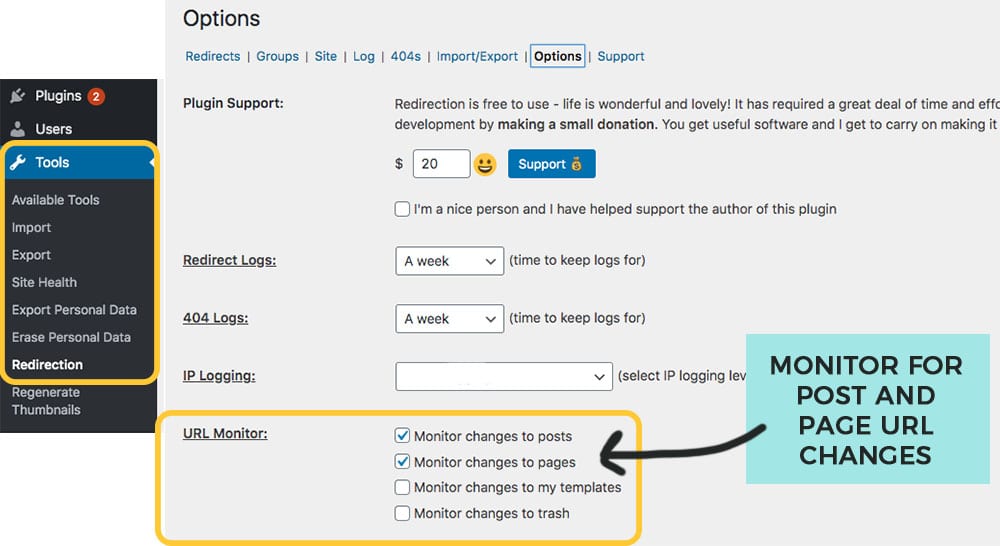
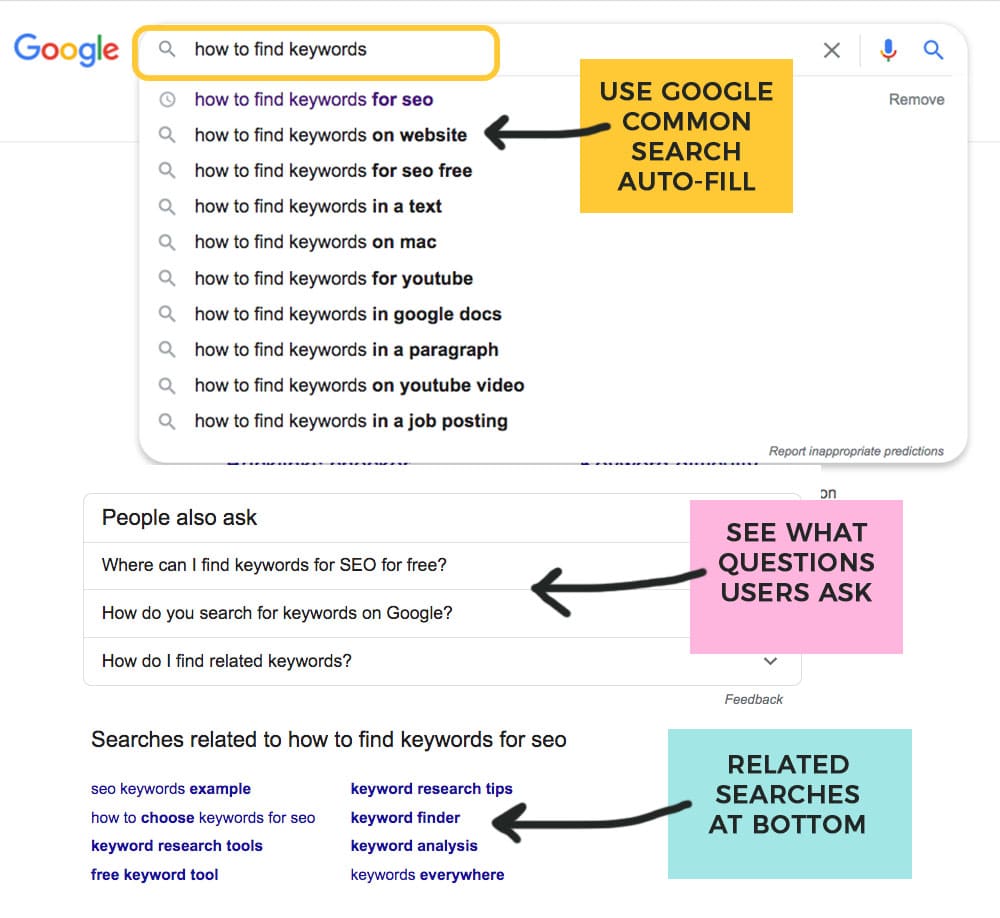
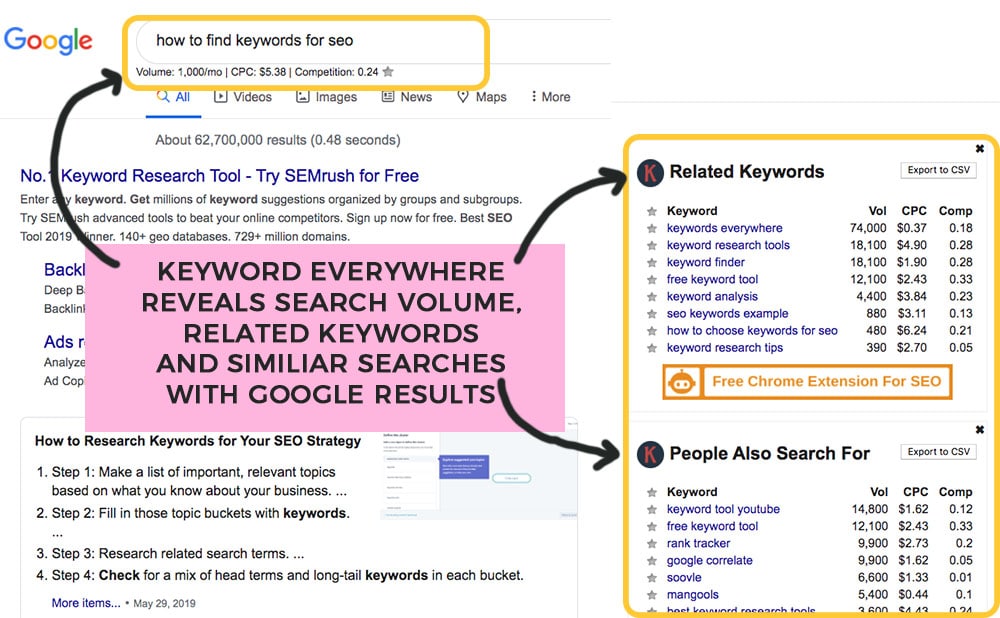
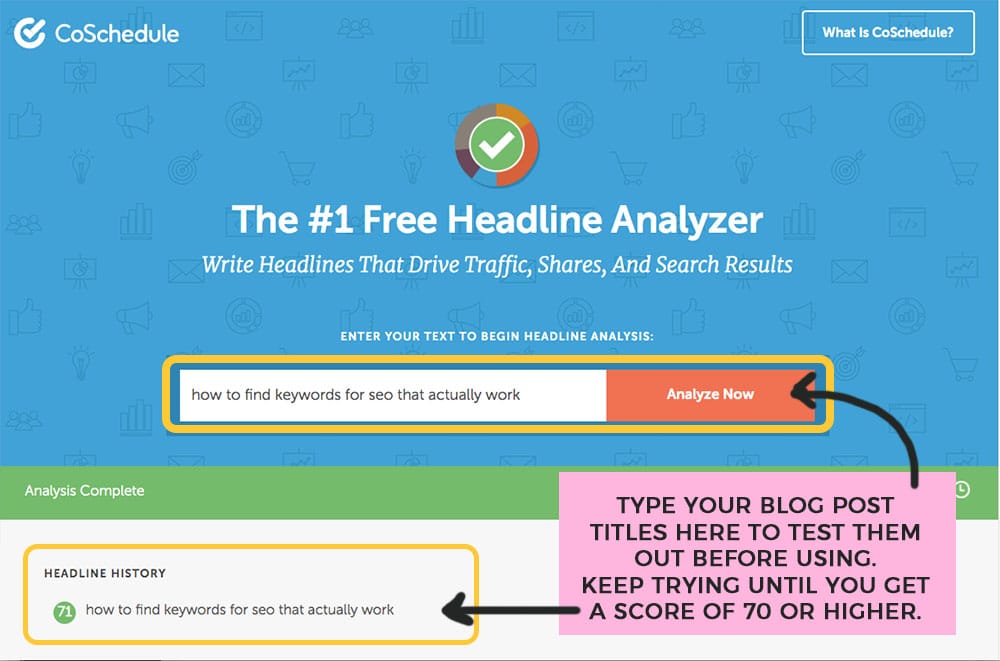
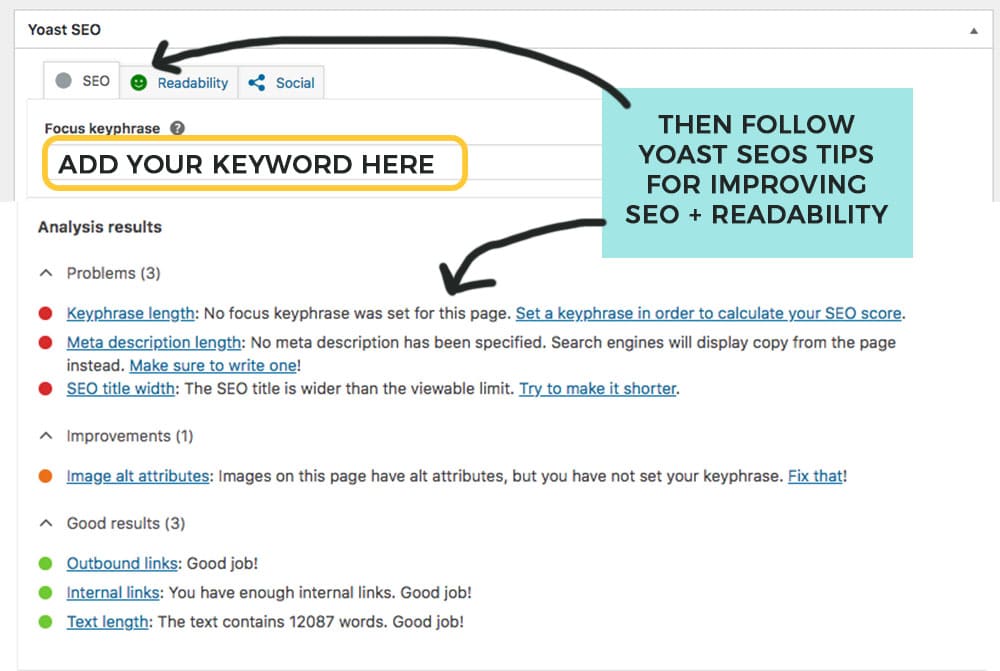
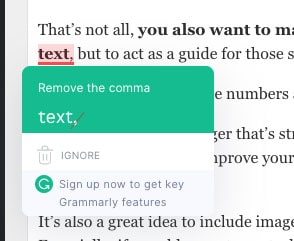
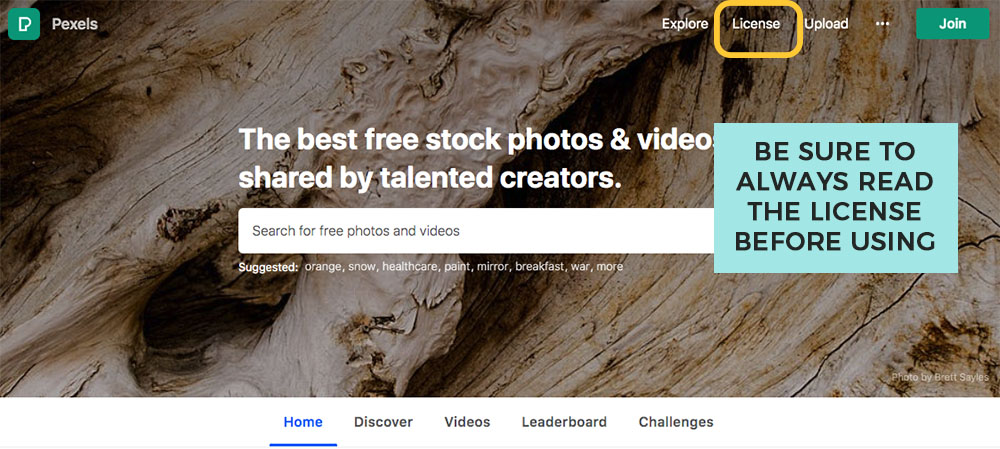





Mimi says
I actually have a friend who wants to start a blog, I’ll forward this to her cause it’ll be more helpful than me trying to explain all the points.
Nadalie Bardo says
Thanks for sharing, Mimi! It’s funny how you think it’s so simple cuss you’ve done it until you try and write out all the steps to starting a blog. Weeks later you’ve published an epic post.
Bhagyashree says
Your post has everything new blogger will be looking for. I have already shared the link with all those who will need guidance. Keep guiding.
Sending you love and positivity.
Nadalie Bardo says
Aww, thanks for much for the blog post love. I wanted to make sure new bloggers had ONE POST to answer all their questions about starting a blog.
Marina Lotaif | Yes To Tech says
This guide on how to start a blog is absolutely epic!! I wish I had this around when I got started! It would’ve saved me so much time and effort piecing everything together!! 🙂
Nadalie Bardo says
Thanks, Marina! I do think it’s my most-epic post ever!
Marta says
This is an exhaustive how-to on starting a blog! I wish it was around when I started mine!
Nadalie Bardo says
Hey Marta,
It sure is! I’m so happy it’s finally out there, I’ve been putting it together for so long. Happy blogging!
Monica Tatomir says
I have just recently started a blog. I put together most of the things you mention, but I had no idea you need legal documents as in certified by a lawyer. I need to look into that, thank you for sharing!
Nadalie Bardo says
Hey Monica,
GIRL, you should 100% get legal pages. I advise that they’re created by a lawyer, a lot of the free ones aren’t.
Michelle says
I just started my blog, and still working out some of the kinks! I will be keeping these in mind! Thank you!
Nadalie Bardo says
Hey Michelle,
Congrats on the new blog! It’s such a rewarding journey.
Jess says
Oh my goodness! Where was this when I started my blog! Super informative. Love how you spelled it all out. Will definitely pass this onto friends who are thinking of starting a blog.
Nadalie Bardo says
Haha, right? I thought the same thing. Thanks so much for sharing!
Kay | Blowing Bubbles With Mama says
A great post for starting a blog! Extremely detailed! This is what you need, lots of great information, all in one place.
Nadalie Bardo says
Thanks Kay, so glad you found it helpful! Happy blogging.
Ina Libra says
Super helpful. Wish I knew all these tips when I started. Thanks for sharing!
Nadalie Bardo says
Thanks so much Ina! So glad you loved my complete beginners guide to blogging.
rosemary | a hint of rosemary says
Wow! I’m so impressed with the vast amount of information and advice you have offered here! I’ve been blogging for a few years and can’t wait to check out some of your points. Thank you so much!
Nadalie Bardo says
Hey Rosemary,
Thanks so much, so glad you’ve found this epic guide to starting a blog helpful. One thing I’ve learned about being a blogger is there’s always something new to learn or try. Happy blogging!
Christa says
This is such a comprehensive guide! You shared so much valuable information.
Nadalie Bardo says
Hey Christa,
What can I say, when I set out to create the ultimate guide for beginner bloggers, I just couldn’t help myself.
Shetu | believeinsimplicity.com says
This is a very detailed and helpful post! I think it covered every single thing one has to know to start a blog with WordPress. Thanks so much for sharing! 🙂
Charlotte Jessop says
That is one heck of a guide! I’ve been blogging a while and even I learnt some stuff. Thank you for this.
Nadalie Bardo says
Hey Charlotte,
Awesome, glad my guide to starting a blog was helpful!